PST file format is one of the common file formats to keep the Outlook email data. PST stands for the Personal Storage Table. It can store all the mailbox data and its attributes, such as emails, contacts, calendars, etc. However, using PST sometimes causes problems like corruption, the immediate shutdown of Outlook, and others.
Therefore, with the advent of a cloud-based service popularly known as Office 365, users are importing PST to Office 365. It serves various facilities such as Exchange Online, Skype for Business, and SharePoint and does more than just manage emails. Apart from these functions, some other features influence most users to import PST to Office 365 mailboxes.
Some Common Reasons That Initiate Users to Import PST to Office 365:
- Office 365 is a one-stop solution for professionals. Users get multiple services in a single subscription.
- You get all-time accessibility from anywhere.
- There are subscription plans for every kind of user, from home users to Enterprises.
- No need to update from one version to another as it always remains updated, hence no downtime.
What is a Shared Mailbox in Office 365?
- Shared Mailbox in Office 365 helps an organization collaborate by allowing it to share the details with all members from a single mailbox.
- Users with whom the Shared mailbox is shared can change the data, and all members can view the changes.
- A Shared Mailbox has all the components of a normal mailbox like inbox, contacts, calendars et cetera.
Manual Method to Export PST to Office 365 Shared Mailbox:
- Open Control Panel >> Mail (Microsoft Outlook 2016) (32-bit).
- Then, the dialog box appears of mail setup; click the Show Profiles… option.

- Click on the add button and create an Office 365 profile (Account with the delegated Rights). Fill in all the required credentials and then click on the Next.

Note:- After clicking on next, wait for a while until the configuring process is running. Then, click on the finish button./p>
- In the Mail dialog box, Select the Office 365 Profile, move your cursor, and select the Always use this Profile option. Select Office 365 and then, click on Apply > OK.

- Now open Microsoft Outlook on your local system. On the taskbar, click on the File tab.

- Click on Open & Export > Import/Export.

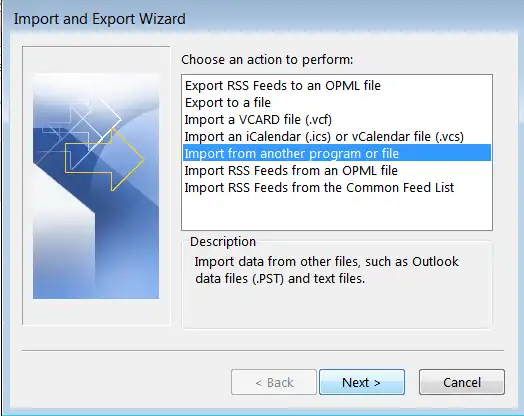
- From Import and Export Wizard, select Import from another program or file option and then click on Next to continue the process.

- Then Export to a File dialog box appears, and select Outlook Data File (.pst). Click Next.

- Click on the Browse… button select the required PST file that you want to import and select the required option whether you want to avoid duplicate items or not. Click on Next.

- Now, select the folder from the Outlook data file (pst). Click on the Finish button.

- Then, wait for a while until the process gets completed.

Note:-It may take some time to fully complete the process.
Be Aware of the Facts Before Going with the Manual Way:
- Manual methods fail to import large-size files and even restrict the users from selecting and importing multiple files altogether.
- You need proper technical knowledge to execute the task errorless.
- While importing data to Office 365, if your process gets interrupted for any reason, you must start it from the beginning.
Hence, the manual method is professionally unsuitable for importing PST to Office 365. To resolve this issue, Shoviv Software has developed Shoviv Outlook Suite, which easily imports PST to Office 365 flawlessly. Below are some exciting features of Shoviv Outlook Suite
1.Easily migrates corrupted and non-corrupted PST files into multiple destinations: Live ¬Exchange, Office 365, and Outlook profile store.
2.One can smoothly import a large-sized PST file. Furthermore, it allows users to split the large-sized PST file into small PST files by giving a size limit.
3.It can easily select multiple numbers of PST files and migrate them into Office 365 altogether.
4.Shoviv Outlook Suite has a very easy-to-understand GUI; hence, any novice user can easily import PST to Office 365.
5.Users get a free trial version and technical support with Shoviv’s tool.
Steps of Shoviv’s Tool to Import PST to Office 365: -
1.Download and install the Shoviv Outlook Suite.
2.Open the software. Click on the Add Source option from the ribbon bar.

3.Select the source type. Then, add or search for the required PST files. Click on Next.

4.The user can view the content inside the PST file.

5.Click on the required folder and then choose to export multiple OST/PST into >> Office 365 mailboxes.

6.Check/uncheck for the required sub-folders. Then, click on the next to continue the process.

7.Select the option to retrieve all mailboxes from the Outlook profile and select the required profile. Then, click on the 'next'.

8.After this, map the mailbox by selecting a row and clicking the Next button.

9.Then, set the filter criteria by process message class and process item date.

10.Now, here, the process is completed successfully.

Wrapping Up:
For importing PST to Office 365, we have explained both ways: manual and professional. So, it is clear from the above scenario that the manual method is not an easy and effective way while Shoviv’s utility to import PST to Office 365 is recommended by the professional. Users can simply install and run the Shoviv Outlook Suite to try it for free.


