Nowadays, emails are the primary way for small and large businesses to communicate. However, ensuring email security is necessary for users as the number of cyber-attacks is increasing day by day. For this, one of the most effective solutions is managing Outlook external email warning in Office 365 cloud SaaS. In recent years, users have faced phishing email attacks, which are the biggest security threat and need instant action. So, read this blog till the end and know how to avoid phishing email attacks.
What is an External Email Warning and Why Should You Use it?
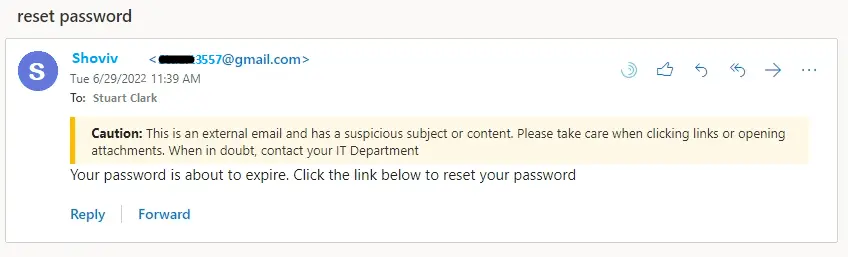
The external email warning in Office 365 notifies users when they receive an email from an external sender. It helps users to avoid cyber-attacks, such as phishing attacks, malicious links, etc. Let us understand why users should be concerned about Office 365 external email warnings.
- It alerts users when they receive threats from an external sender.
- Also, it helps users identify suspicious emails, so they should not open malicious links or attachments.
As we have understood why users should manage Outlook external email warnings in Office 365, we will now understand the stepwise procedure to manage external email warnings.
Techniques to Enable External Warning Banners in Office 365
Users can use two methods to manage Outlook external email warning in Microsoft 365. The first uses the Exchange Admin Center, and the other uses the MS PowerShell command. So, let us now understand the stepwise procedure of each method.
Method 1: Through Exchange Admin Center (EAC)
We will learn the stepwise procedure for using the Microsoft Exchange Admin Center. Kindly follow each step carefully and effectively manage Outlook external email warning in Office 365.
- Open the Office 365 Admin portal and log in with admin credentials.
- After that, move to the Exchange Admin Center.
- Choose the Mail Flow tab and tap the Rules
- Then, click the (+) button to create a new rule.
- Provide a name to your rule, like ‘External Email Warning’.
- Thereafter, tap the “Apply this rule if…” and choose the “the sender is located…”
- Select the Outside the Organization option to continue.
- Afterwards, tap “Do the following…” and choose the “Prepend the subject…”
- Now, set the external warming message and add a disclaimer message if you wish.
- Ensure that the external email warning is working by sending an email from an external account.
That is how users can use the Exchange Admin Center to manage Outlook email warnings in the Office 365 cloud SaaS. Now, we will understand another solution to complete this task.
Method 2: Managing External Warning Using PowerShell Commands
Users can also enable external email warning in Office 365 using the Microsoft PowerShell commands. Let us know the steps to complete this task effectively.
- Open the Microsoft PowerShell as administrator.
- After that, run the below command to install the Exchange Online Management Module.
Install-Module -Name ExchangeOnlineManagement- Connect to the Exchange Online using the following command.
$UserCredential = Get-Credential Connect-ExchangeOnline -UserPrincipalName $UserCredential.UserName -Password $UserCredential.Password- Then, create the rule to add an external warning with the help of the below command.
New-TransportRule -Name "External Email Warning" -FromScope NotInOrganization -PrependSubject "[External]"- Thereafter, test the email warning by sending an email from an external sender.
Users can use these methods to enable Outlook email warnings on the Office 365 cloud-based platform. We will share how users can turn off the external warning banner from their Exchange Online.
Methods to Turn Off External Email Warning in Microsoft 365
Two ways can turn off the external email warning: using Exchange Admin Center and PowerShell commands. Let us understand both of them and know how to manage the external email warning in Office 365.
Method 1: Disabling External Email Warning via EAC
Using the Exchange Admin Center, users can turn off the external warning by deleting or turning off the transport rule that has already been created. Let us share the steps to do it.
- Open the Exchange Admin Center and log in with admin credentials.
- Choose the Mail Flow and click the Rules option.
- After that, select the rule and click the disable button to turn it off or click the delete button to delete it.
- Users can disable the external email warning in Office 365 by completing these steps.
Method 2: Using the Microsoft PowerShell Commands
Users can also remove or disable the transport rule using the PowerShell commands. To turn off the external warning, users can follow the steps below.
- Open the Microsoft PowerShell command.
- Run the below command to turn off the rule.
Disable-TransportRule -Identity "External Email Warning"- Use the command below to delete the transport rule.
Remove-TransportRule -Identity "External Email Warning"This is how you can use the PowerShell commands to disable Outlook external warning in Office 365. When performing these steps, kindly ensure you have a backup of your data on the local drive to avoid unexpected issues. For this, we recommend that users use the Shoviv Exchange Server Suite, which we are going to share in the following section.
What are the benefits of the Shoviv Exchange Server Suite?
Shoviv Exchange Server Suite is a one-stop solution for various Exchange Server-related tasks and issues. It perfectly recovers the OST, PST, and EDB files without affecting a single item. Moreover, this tool allows users to export the Exchange mailboxes to various targets, such as PST, Live Exchange Server, and Office 365. It helps users to keep a backup of the data in PST format on their local drive. This software has a user-friendly interface and allows all users to access this software effectively.
Also, users can transfer their PST files directly into the Office 365 and Live Exchange Server using this professional tool. It also has a filter option to include or exclude items on the basis of message class and date. Users can easily move a single mailbox into various PST files with the help of this software.
Wrapping Up:
This blog taught us how users can manage Outlook external email warning in Office 365 using Exchange Admin Center and PowerShell commands. Moreover, this blog also shares solutions to enable or disable the external warning. Before performing these solutions, we recommend users keep a backup of their emails using a professional tool, like Shoviv Exchange Server Suite. Users can also check its free demo version and process the 50 items per folder freely to see how it works.

- How to Backup and Restore Emails in Webmail? - March 25, 2025
- How to Migrate Outlook to New Computer? - February 15, 2025
- Fix If Outlook Cannot Display the Specific Folder Location - February 1, 2025