OneDrive was officially launched as SkyDrive in 2007 and later, in 2014, renamed as OneDrive. It is now one of the most recognizable cloud storage facilities, allowing users to share, sync, save and edit their files and documents. OneDrive users are aware that documents and files are essential parts of their business. So, they look to move files from OneDrive to PC in Windows 11 & 10. It helps them to keep a backup of their important files, avoid storage-related problems on the cloud, and save essential files to the desired location.
It is easy for users to know how to move files from OneDrive to Windows 11 & 10 PCs. For this, they have to focus on this professional blog. Here, we will explore different approaches that allow users to save OneDrive files locally and easily on their PCs. It does not matter whether users use Windows 11 or 10; the solutions below will definitely move OneDrive files to a PC without hassles.
Why does moving OneDrive files to the PC make sense?
OneDrive files and documents store crucial information about organizations. So, users need to move files from OneDrive to PC to have data secure on the local drive. Let us share a few benefits of transferring OneDrive files to their computer.
- If users want to have a backup of their essential files into a local drive, they can move their OneDrive files to a PC.
- Moreover, when users move files from OneDrive to PC, it will also help them avoid storage-related issues in OneDrive.
- Users also do not need an internet connection if they have data in their hard drive from OneDrive. It allows users to access their files and documents offline.
These advantages allow users to move files from OneDrive to their Windows 11 or 10 PC. Now, we will look at the ways that users can apply to migrate OneDrive files to a PC in a smooth environment.
Trusted ways to move or export OneDrive files to Windows 11/10 PC
We will discuss some easy and reliable solutions in this blog to effectively move files from OneDrive to PC (Windows 10/11). Below, we shared a detailed working of each solution so that every user can easily migrate OneDrive files to Windows 11 or 10 PC.
Sol 1: Directly downloading OneDrive files to PC
To process this OneDrive file transfer, you have to access the OneDrive web with your Microsoft account. Then, follow the steps below and easily take your OneDrive files to a local drive on your PC.
- Login to OneDrive using your account.
- Go to the My Files option and select the files or folders you wish to take to the local drive by downloading them.
- Then, choose the Download button to move files or folders from OneDrive to your PC.
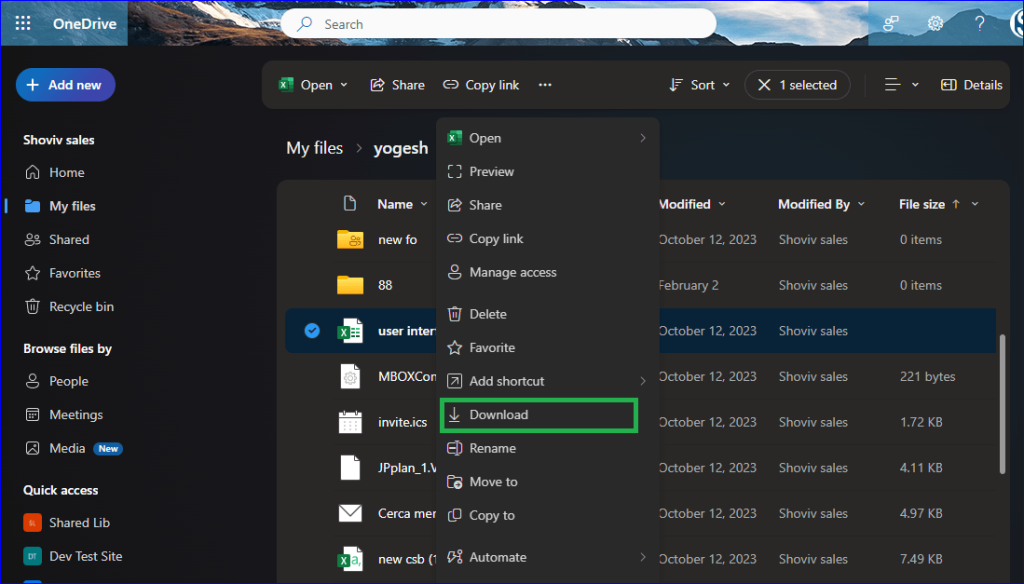
- It will download all selected data in a ZIP file, unzip it, and move it to the desired location on your PC.
We hope you understand how to move files from OneDrive to Windows 11/10 PC using the above steps. Now, we will tell you the simple steps that you can use to take their files from the OneDrive desktop application to your PC.
Sol 2: Using OneDrive Desktop Application
In this method, we are going to learn how to use the File-Demand option to move files from OneDrive to a PC. For this, ensure you have the OneDrive application on your desktop and then apply the steps below.
- Open the OneDrive; go to the system tray and click the OneDrive icon.
- Then, tap the Help & Settings icon and go to Settings.
- Expand the Advanced Settings option in the Sync and Backup tab.
- After that, switch on the Files On-Demand and wait till the OneDrive restarts.
- Thereafter, go to the Files On-Demand option and click the Download All Files button.
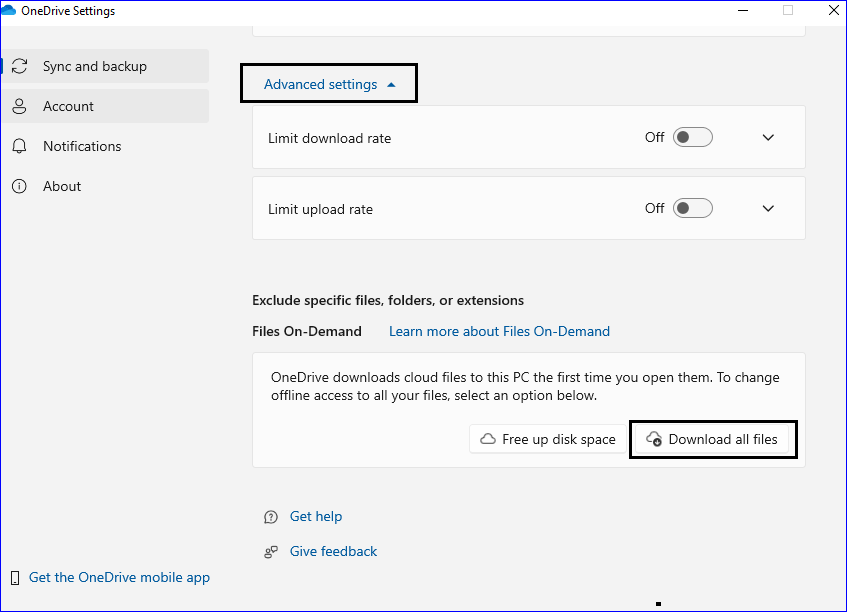
- Lastly, confirm the files downloading by clicking the Continue button.
Users can easily use this solution to download OneDrive files to their PC if they have the OneDrive application on their desktop.
Sol 3: With the “Folders you choose will be available on this PC” option
We will use the Account Settings to choose folders that will be available on this PC. The steps are shared below; follow them to move OneDrive files to your PC.
- Open your OneDrive desktop application on your PC.
- Click the OneDrive icon from the system tray, select Help & Settings and tap the Settings option.
- Then, you have to select the Account tab and click the Choose Folders option.
- Check the Make all files available option and tap Ok if you want to process all folders.
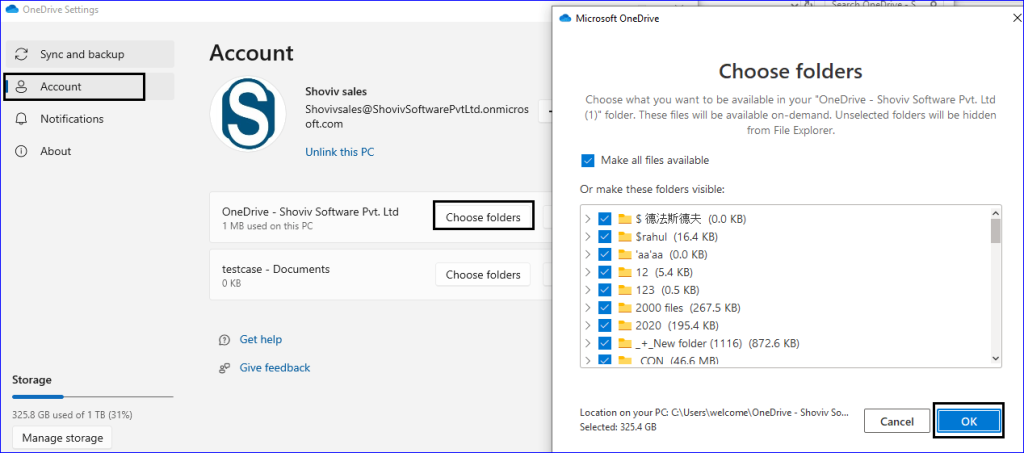
- You can also select specific folders by ticking them and hitting the OK button to confirm.
This is what you have to do when using the Choose Folders option to move files from OneDrive to Windows 11 & 10 PCs.
Sol 4: A professional OneDrive Backup Tool
The trusted and authentic way to move files from OneDrive to a PC is the Shoviv OneDrive Backup Tool. This software has many features that help users quickly transfer OneDrive files to Windows 10 & 11 PCs. It also offers a user-friendly GUI, which allows every user, even novice ones, to backup or move OneDrive files to a PC. Moreover, this tool takes every kind of data from a OneDrive account to a PC, including videos, photos, files, documents, etc.
This software also provides a filter option, which users can use to include or exclude items just before beginning the backup task to move OneDrive files to a PC. Users can also schedule or set backup periodically using its scheduler option. It allows users to set backup tasks daily, weekly, monthly, or at any specific date or time. Let us know how this tool moves files from OneDrive to a PC.
Steps to instantly move OneDrive files to a PC
- Open the Shoviv OneDrive Backup Tool on your device.
- Select your OneDrive files, photos, videos, documents, etc to move.
- Choose the target, apply filters and schedule the backup job if needed.
- The tool will start moving OneDrive files to the PC.
Wrapping Up
We hope you are now very well aware of the common solutions for moving files from OneDrive to Windows 11 & 10 PCs. Moreover, we also elaborated on the Shoviv OneDrive Backup Tool, a quick and secure way to move OneDrive files. Users can process multiple OneDrives using this professional software in their system.
This tool also has a free trial version that users can download on their PC to check its detailed working. Moreover, its free version can process up to 20 kb items, which helps users know its functionality and efficiency before purchasing its full version.
- How to Import or Export Contacts in Any Outlook Version? - March 31, 2025
- Understand Groups & Permissions on a SharePoint Site - March 21, 2025
- My Outlook Emails are Stuck in the Outbox! What’s Going On? - March 12, 2025


