Gmail to Office 365 migration is on trend as there are many reasons that are accelerating this migration. Office 365 is a cloud-based software as a service that is attracting the market by providing a one-stop solution. The reason may differ for every user, but the search for an efficient way to migrate is the same. You have landed on the right post if you also seek a perfect solution to migrate Gmail to Office 365. This write-up will cover all the verticals of this task.
Before moving for the way to migrate Gmail emails to Microsoft 365, it is wise to know why migration is needed. However, for everyone, reasons vary depending on the current requirements and plan. Still, some probable reasons are:
- Most users are familiar with Word, PowerPoint, Excel, and other products of Microsoft. Familiarity gives a sense of comfortability; hence, users find themselves more comfortable with Office 365 than any other platform.
- Microsoft has the first mover advantage, and because of this, Microsoft has several helping documents, a customer help/support center, and other user-centric services.
- As a subscription-based software service, Office 365 plans are more user-oriented and offer a better pricing model.
- Reasons like company switching, acquisition, and business decisions also initiate users to migrate Gmail to Office 365.
Get a easy to use software solution to migrate your IMAP emails to Microsoft 365 mailbox.
Download Shoviv IMAP to Office 365 Migration tool.
How to Migrate from Gmail to Office 365 Manually?
Pre-requisites for Migration:-
Users should follow certain requirements to migrate Gmail mailboxes to Office 365. To connect O365 with the Gmail account, create the app password for all Gmail accounts. After that, you must follow certain procedures to migrate successfully.
Phase: 1 Verification of a Domain
The first and foremost step that requires fulfillment by the users is to verify that they own a Gmail domain before starting the migration.
Phase:-2 Creation of Users in Microsoft 365
It’s your choice to add single or multiple users at the same point in time. However, creating the mailbox and assigning a license to each user is important. Later, you will be required to connect each of the Office 365 mailboxes with Gmail to share data.
Phase:-3 Preparation of a list of Gmail Users to migrate
After creating the Office 365 mailbox list, kindly prepare a list of all Gmail mailboxes for migration. It would be better if you could make an Excel sheet with the details each mailbox requires to migrate into Office 365. Also, please add an app password for each Gmail user; otherwise, the normal password will not work.
Note: – You do not need to migrate all mailboxes simultaneously; it is better to migrate in small batches. Also, the maximum number of mailboxes you can migrate is 50,000. We have shared the step-by-step process for how you can create a list of users, which is as follow:
-
-
- Kindly login into the Google Workspace admin console. Make sure only to use the admin credentials.
- Once you successfully log into the account, visit the user section.
Phase: 4 Connect Office 365 with Gmail
To migrate Gmail to Office 365, the user must create a connection between the source with the target. In addition, Microsoft 365 uses the migration endpoint to make the connection. So we have explained the process to do the same, which you can check below:
- Quickly open the EAC (Exchange Admin Center).
- Once opened, click Recipient>>migration and click on the More setting option.
- Click on Migration endpoint, then click new + to form the new migration endpoint.
- Now, you must choose the IMAP option from the select migration endpoint option.
- Kindly mention the required details on the IMAP migration configuration page.
-
IMAP Server: imap.gmail.com
Server Settings: By default
-
-
- Later on, make sure to press on Next button. Here the services of the migration will utilize the system to make the connection with Gmail. Suppose the connection works; the new page, known as “Enter general page information”, will open up.
- Here, must mention the name of the migration endpoint.
Phase: 5 Creation of the migration batch
Start creating the migration batch consisting of the Gmail mailboxes.
- Log on to the Office 365 admin centre and click Admin centre. Move ahead by hitting on Exchange.
- Now navigate to the Recipient>Migration.
- Click on the plus sign and select Migrate to Exchange Online.
- Choose IMAP migration and move further after clicking on Next.
- Select the user which will appear where you will be required to specify the user you are looking to migrate, which can be done by uploading the file containing the list of user mailboxes with the help of the browse button.
- Once done with the above process, Office 365 will verify the uploaded list and display all mailboxes. After that, click on Next.
- Select the migration endpoint window will now open. Select the already created list and click on Next.
- Now, the configuration page for IMAP Migration will open. Choose out the already selected values and press the Next button.
- Also, mention the name of the migration on the Move Migration Page.
- In the Start Migration Batch page, kindly select the required option and start the migration.
-
Once done with the above-explained procedure to migrate Gmail to Office 365, make sure to follow two more steps:
- Updating the DNS Record to make sure to route new emails directly to Office 365
- Stop synchronization with Gmail
-
Migrate Gmail to Office 365 – Professional Way?
Search for an efficient way for the Gmail emails to Microsoft 365 migration is in trend. For this task, going with the professional third-party tool provides the best work experience for the professionals. No manual method offers a satisfactory way to migrate Gmail to Microsoft 365. Hence, we need an advanced utility, and Shoviv Software offers Shoviv IMAP to Office 365 Migration tool for the same. This software provides a way to migrate emails from Gmail to MS Office 365 quickly and effortlessly.
Simple Steps to Migrate Gmail Mailboxes to Microsoft 365
Migration from Gmail to Office 365 is easy as pie with Shoviv’s utility. You have to follow these tasks:
- Install and Run the tool.
- Create a connection with the Source IMAP.
- Create a connection with Office 365.
- Click on the Migration Job and create.
- Do mapping, apply a filter if needed, and settings.
- Verify the job details and click finish.
What does the Shoviv IMAP to Office 365 Migration Tool offer?
Shoviv IMAP to Office 365 Migration Tool offers a professional migration method. This software is developed by keeping the users’ requirements at the centre of the development process. Some of its prominent features are:
- This utility runs over job-based processing, and a user can create multiple jobs and run them simultaneously.
- Users can add multiple mailboxes without restricting the size and number. Hence, this utility is a time savior if you are executing migration from Gmail to Office 365.
- If the job stops or you willingly stop, you can resume the G mail to Office 365 migration process from the last stop. It benefits the users when they re-run the job and get only the recently immigrated items in the target.
- This software also helps schedule the Gmail to Office 365 migration process. Users can set the migration process daily/weekly/monthly depending on their needs.
- The software properly maintains the folder hierarchy and preserves the data integrity.
- To get only the desired results, this tool offers the filter facility, too.
- To have control over the failed items, this utility also offers to have a limit on the failed items count whenever a user does migrate from Gmail to Office 365 mailboxes.
- Users also get round-the-clock technical support with Shoviv IMAP to Office 365 Migration Tool.
Also Read: Migrate Google Workspace to Microsoft 365
A Detailed Migration process using Shoviv Software:
Now, we will learn the tool’s works in detail to migrate Gmail to Office 365. All steps with the images are explained below:
- First, you need to install the tool in your system.
- Click the Source IMAP tab and select the Add button.
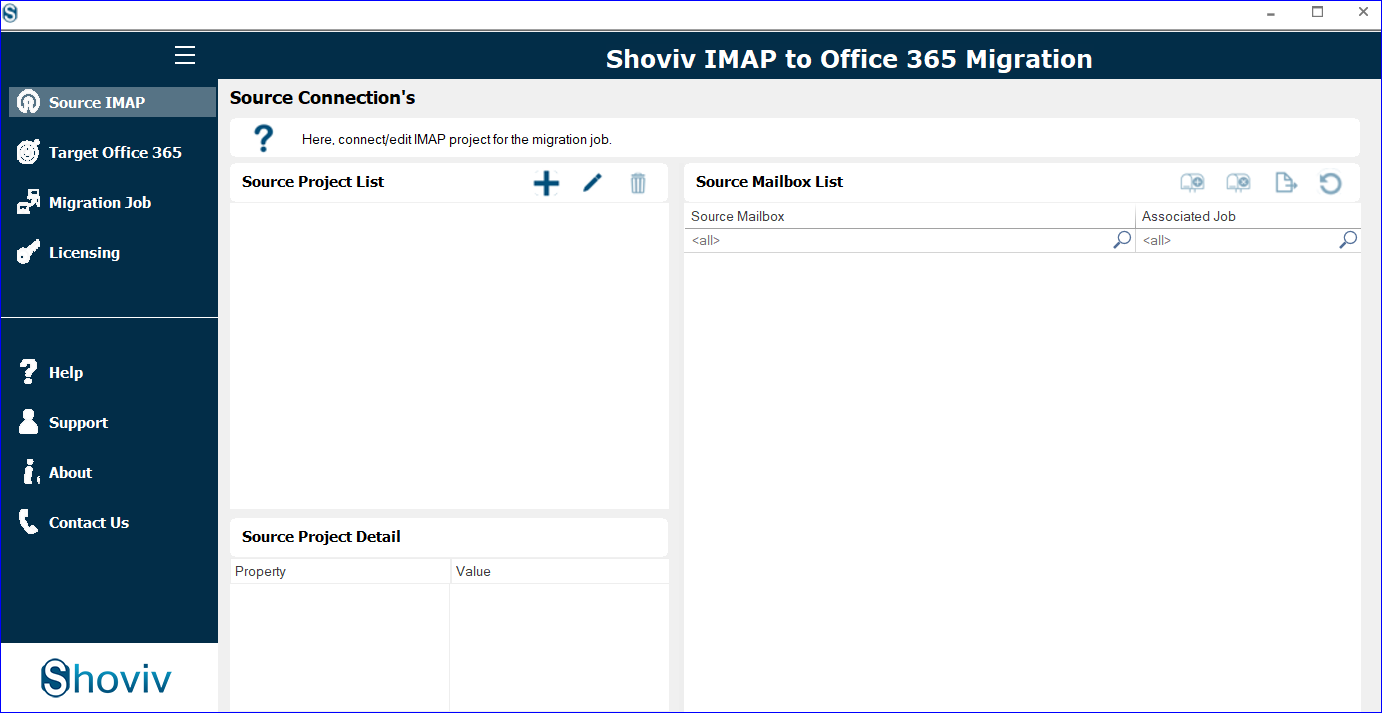
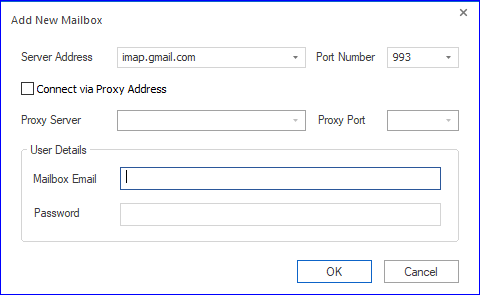
- Enter the Server address, Port number, mailbox email, password and other details. After that, click the OK button.
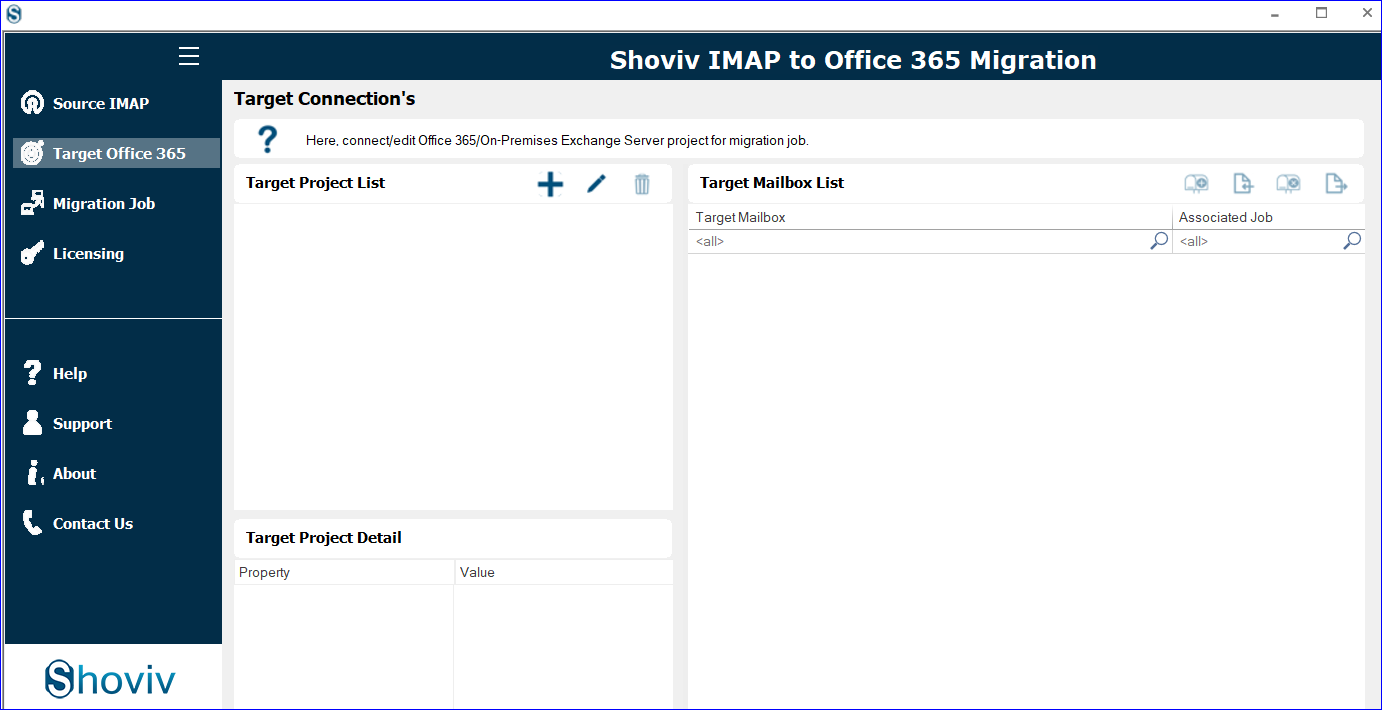
- Tap the Target Office 365 tab and click the (+) button.
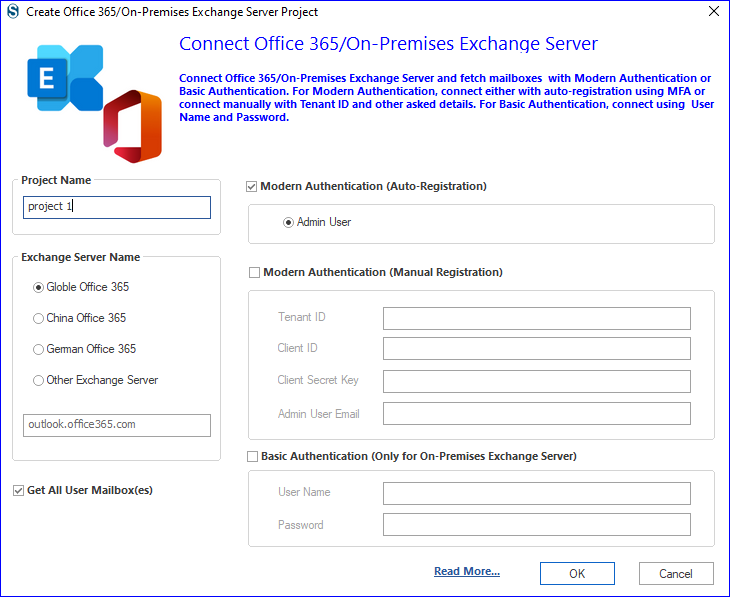
- Provide the Project name, choose the Exchange Server name, check the Modern Authentication (Auto-Registration), and click the OK button.
- After that, enter your Microsoft email address and password.
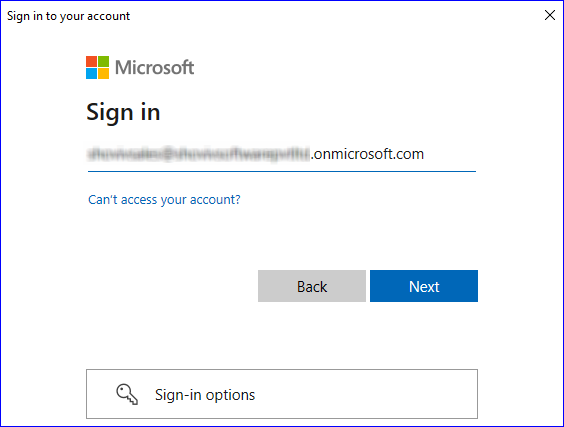
- Verify the identification by using different options.
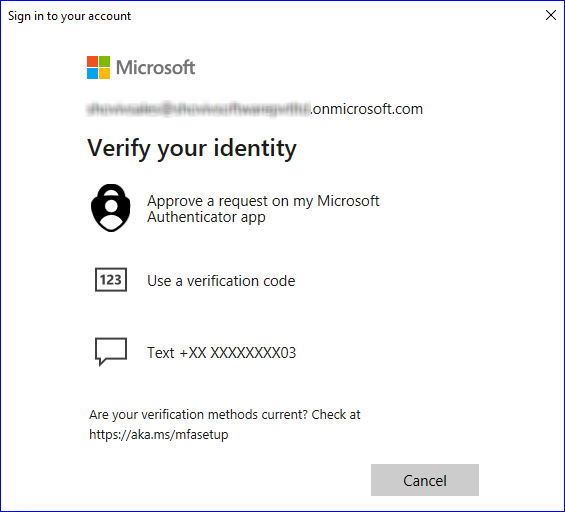
- Then, click the Accept button to accept the Permission request.
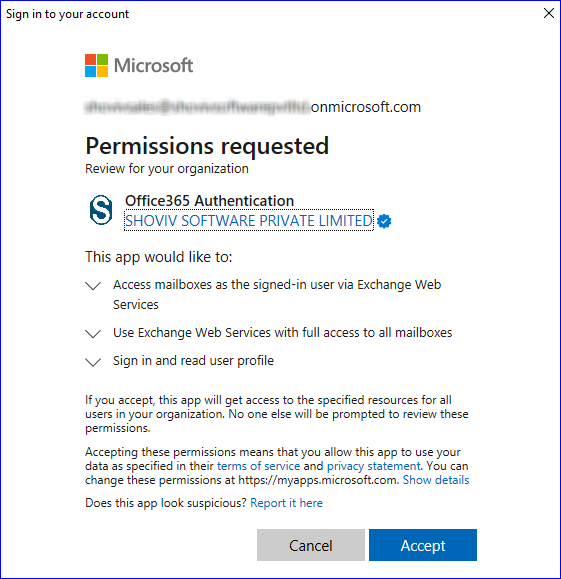
- Click the Migration Job tab and hit the (+) button.
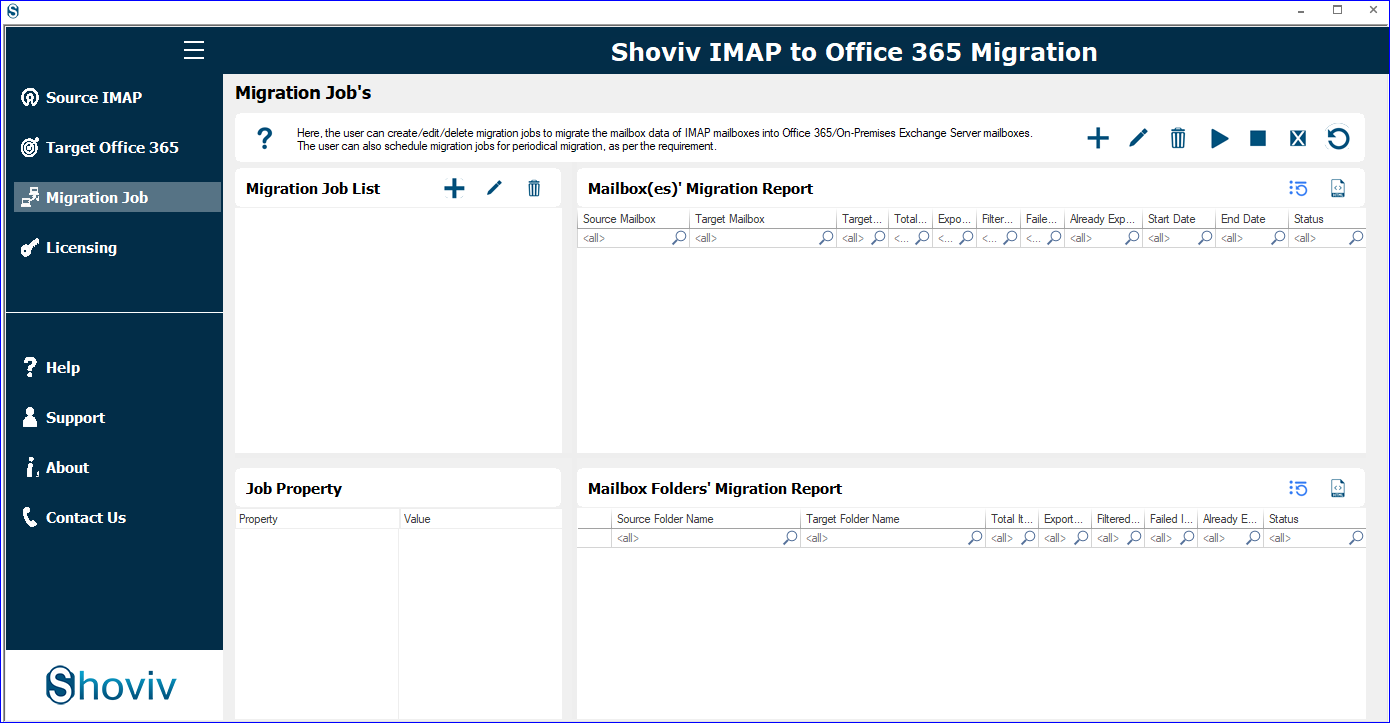
- Enter the Job name, select the Source and target and tap the Next button.
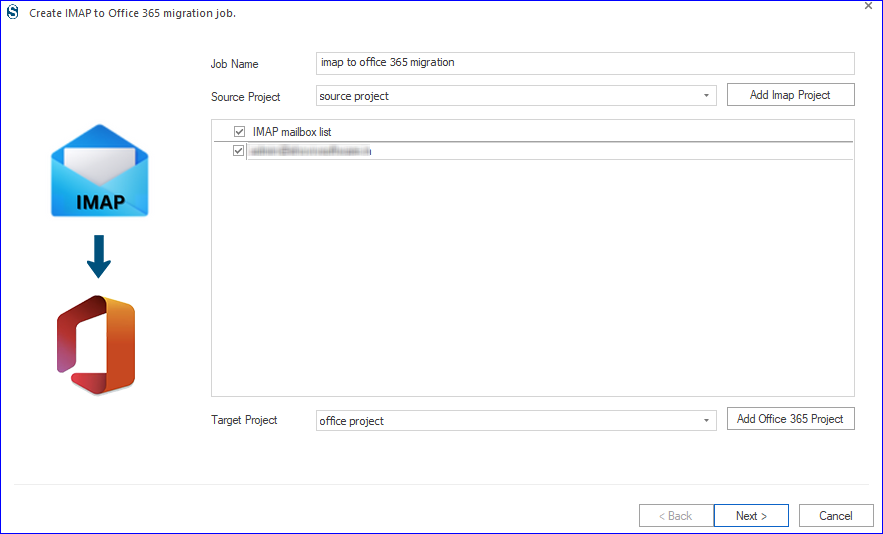
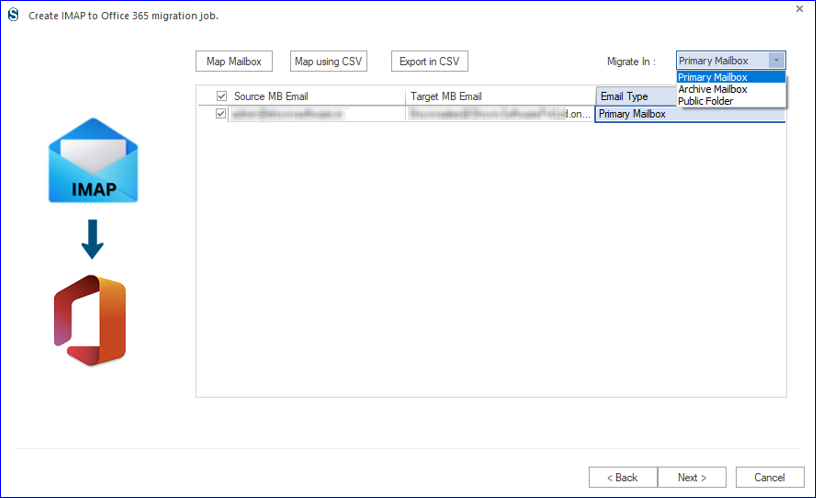
- Choose the mailbox type by clicking on the Migrate In option. Then, map the source mailbox to the target and continue with the Next button.
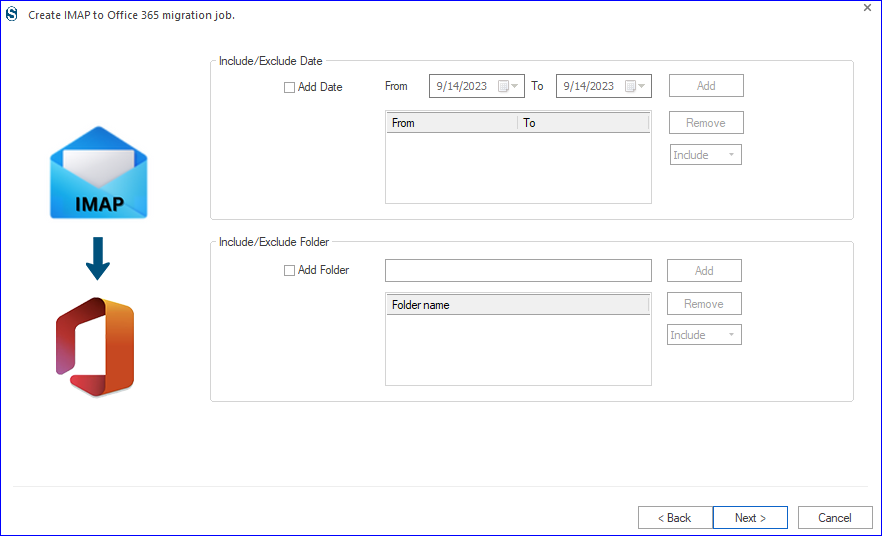
- Filter items using date or folder-wise criteria and hit the Next.
- Set the mailbox and item thread count, and make other changes according to your needs.
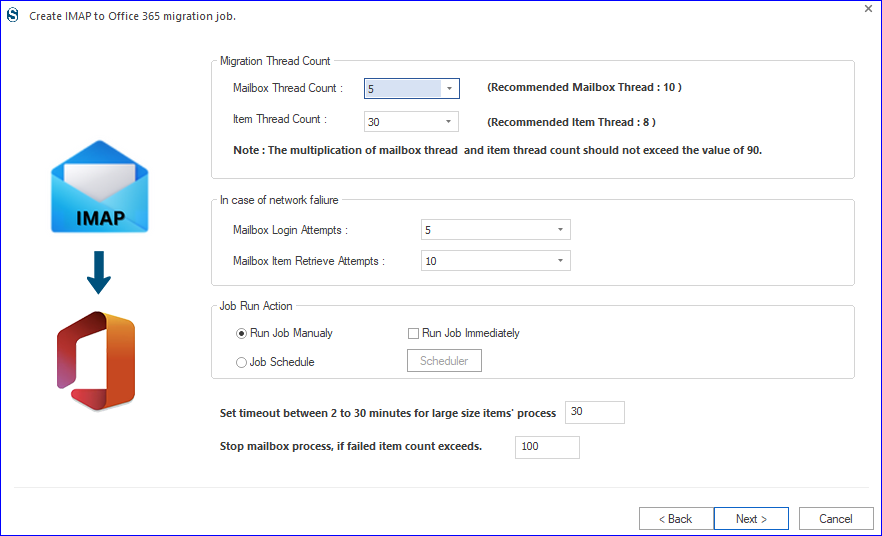
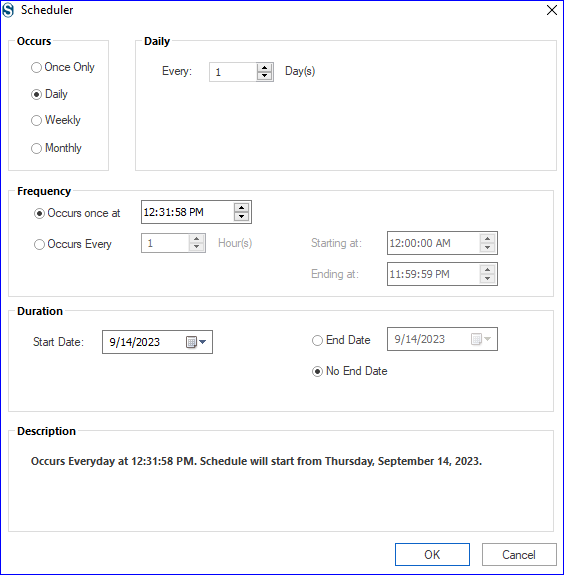
- Schedule the migration job by clicking on the Job Schedule button. Click OK after selecting the scheduled time and then continue with the Next.
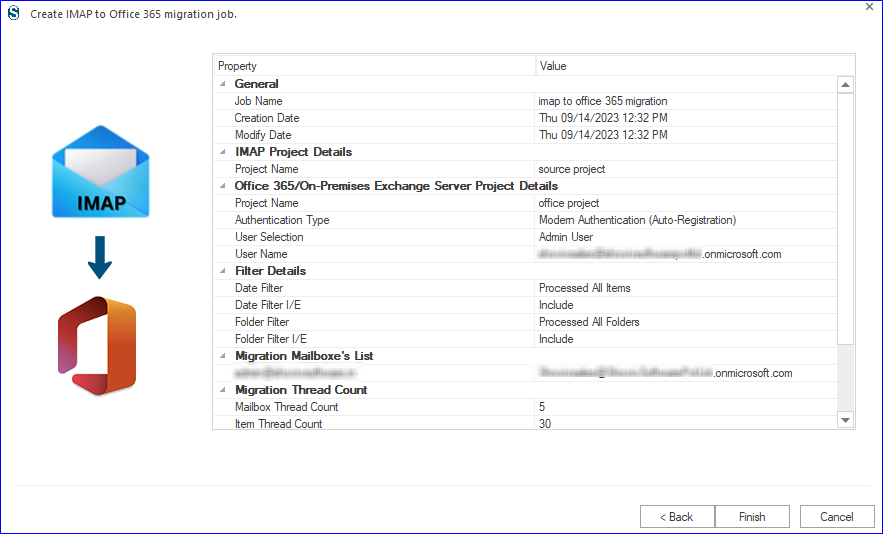
- Cross-check the settings and click the Finish button to begin the Gmail to Office 365 migration task.
This is how you can migrate Email from Gmail to Office 365 with this advanced utility.
Final Words:
Gmail to Office 365 migration is in trend, and various reasons are behind it, and they vary from user to user. For this migration task, the search for an effortless way is obvious, and users get a satisfactory result with the Shoviv IMAP to Office 365 Migration Tool.
This tool has numerous user-centric options that make the migration a cake-cutting process. A free demo version of this tool is also available to download, which allows users to migrate the first fifty items per folder. Download the software and migrate Gmail to Office 365 in a speedy way.


Frequently Asked Questions
A. Follow the below steps:
1. Run IMAP to Office 365 migration tool.
2. Connect source and target.
3. Choose mailboxes and create a migration job.
4. Filter items and use the scheduler to schedule jobs.
5. Click on Migrate to begin the Process.
A. Yes, developed with a highly advanced algorithm, Shoviv IMAP to Office 365 Migration Tool is an automated utility to migrate emails from Gmail to Office 365 in a speedy.
A. Shoviv’s migration utility keeps the originality of the tool intact. The tool doesn’t change the folder structure during the migration task and maintains hierarchy.
A. No, with the Shoviv tool, there are no limitations when migrating from Gmail to Office 365. You can effortlessly migrate your Gmail to Office 365.
A. Yes. The tool comes with a very user-friendly GUI and straightforward processing. A user guide document is also available to help you. If you still need any assistance, you can also contact the Shoviv technical support team. Our technical support team is available 24*7 for you. Users can contact us via live chat/ by writing to support@shoviv.com, or by telephone.
- How to Backup and Restore Emails in Webmail? - March 25, 2025
- How to Migrate Outlook to New Computer? - February 15, 2025
- Fix If Outlook Cannot Display the Specific Folder Location - February 1, 2025

