If you are willing to import the .ost file to Outlook in a manner that allows you to access the OST data, then you have landed on the right post. This write-up describes how to import OST file in Outlook 2016, Outlook 2019, and all other versions. Also, we will understand the need to convert OST to PST file format and its different methods. The practices that professionals use to handle this situation are also explained in this blog. Be with the blog and get your answers.
Instant Solution: Are you looking for a quick & easy way to import your OST file into Outlook? With Shoviv OST to PST converter, you can do it in just a few clicks!
Unavoidable reasons to import OST files into Outlook
This section is going to be a bit lengthy! There are several instances when you need to import an OST file into Outlook.
- Failure of Exchange Server: When the Exchange Server goes offline, your Outlook inbox might appear empty, but your emails aren’t lost. They’re safely stored in your OST file, a local copy of your mailbox. By Outlook import OST file, you can access and work with your emails even without a connection to the server.
- Windows Domain Controller Disconnected or Unavailable: When a Windows Domain Controller goes offline, user authentication and access to network resources, including Exchange Server, become impossible. Importing OST files bypasses this dependency, unlocking cached mailbox data.
- Deleted or Blocked Accounts: Even when accounts are deleted or blocked, OST files locally store valuable data.
- Migrate Data from One System to Another: Changing systems or switching an organization is common. However, you cannot move or import emails from the OST file to Outlook. The only way to do this is by converting OST into PST. PST files are easy to port as well as allow adding PST to any Outlook account.
Let’s go on to the next part, which will show you how to import OST to Outlook 2013 or any other version.
First, Locate the OST files as per your Outlook versions:
There are two ways to locate your OST files.
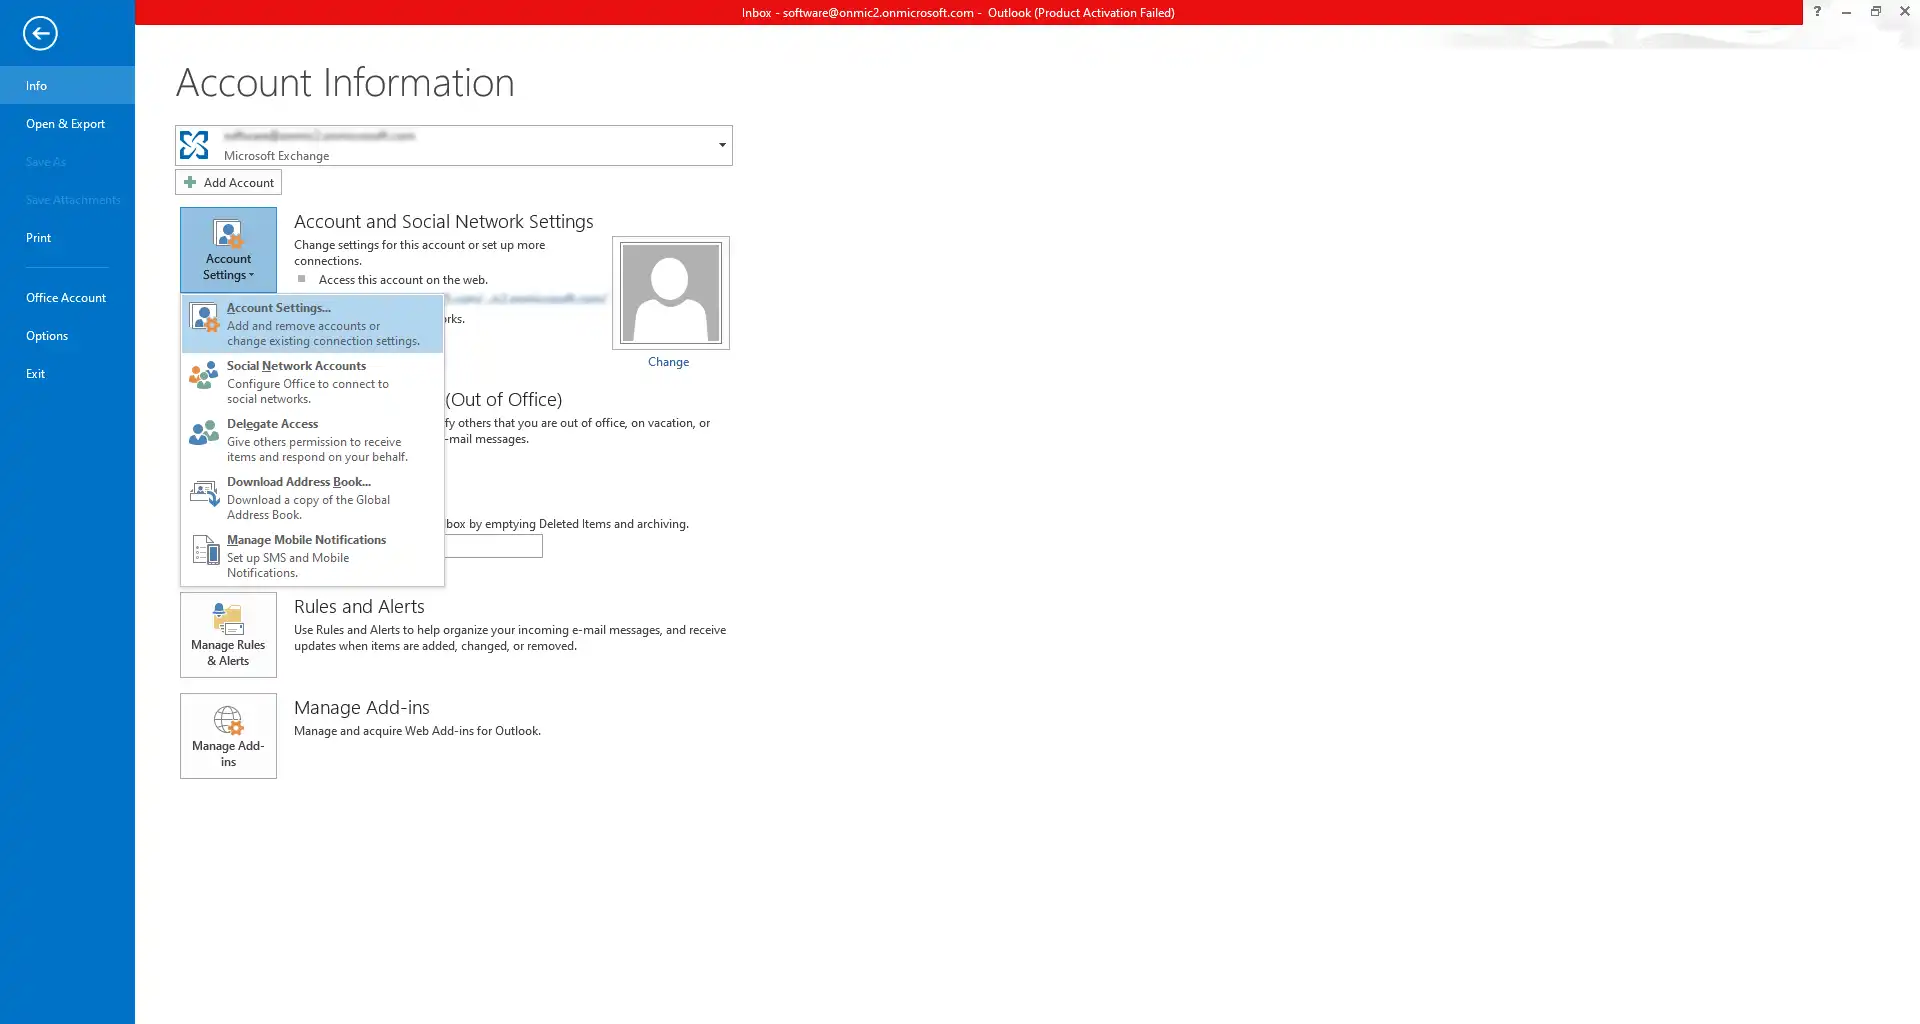
- You can go to the File tab of Outlook and then click twice on the Account Setting option.
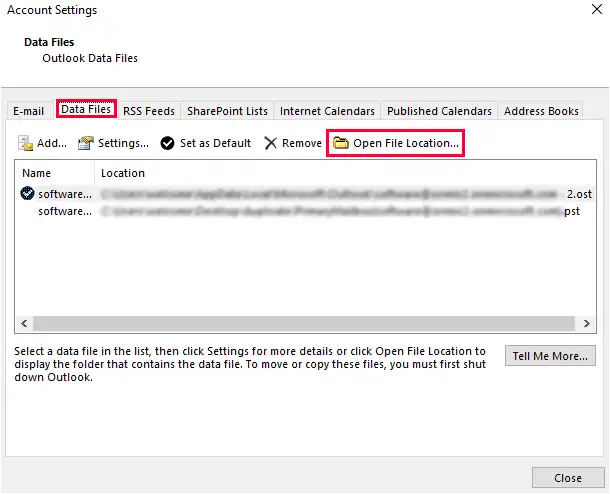
- Next, go to the Data Files tab and click the Open File Location option, and you will be redirected to the OST file location.
The second option is to browse the following location on your Windows Operating System
- Older Windows versions: drive:\Documents and Settings\<username>\Local Settings\Application Data\Microsoft\Outlook
- Windows 10: drive:\Users\<username>\Roaming\Local\Microsoft\Outlook
Import the OST File into Outlook PST Format Manually
We know that to import OST to Outlook, it is mandatory to convert OST to PST, as only .pst can be added to the Outlook account. There are two manual methods that you can commonly use to export your OST data to a PST file but these manual methods are not prevalent among professionals.
- Using Outlook’s built-in Import/Export wizard
- Old email archiving feature.
Choose specific folders or mailboxes to migrate, ensuring a targeted transfer. Import the PST file into Outlook, retaining your data structure and familiar interface.
Importing OST File Using the Archive feature:
It is an Outlook feature that allows you to archive old emails from OST files into PST format regularly. Pursue the following steps:
- Open Outlook and go to the File Tab.
- Click on the Options from the left pane.
- Next, select the Advanced option and click on the Auto Archive Settings…
- The following steps are to set up the auto-archive as per your need. You have to set the day count to run auto-archive. Also, you can set a count to clear old emails.
- Once done, click OK, and Outlook will automatically create an archive of your OST emails at the specified time.
- You can ensure the Archive utility’s working by navigating the location that you pick to save the PST files.
Import OST file into Outlook PST with Import/Export
- Open Outlook and navigate to the File tab.
- Now click on the Open & Export option and hit Import/Export.
- Then, select the Export to a file option in the following wizard.
- Following that, choose Outlook Data File (PST) and click.
- Select the Outlook profile or folder you want to import into PST format.
- At last, browse the folder to save the converted Exchange OST file.
As mentioned, both manual methods can be utilized to import OST file into Outlook, but before using these methods, make sure your OST file is connected to an Exchange Server. Below, I’ve described the drawbacks of both methods. You can read them before utilizing manual solutions.
Why do professionals avoid manual solutions?
- The archive option only archives emails, which you will receive after configuring the Archive settings. Hence, you cannot import complete OST files using this method.
- Importing multiple OST files into Outlook PST is impossible with this utility. Also, there is a chance that your OST file will be divided into several PST files, and you may lose your data.
- The utility is quite slow, like manual methods, which process around a gig of data in an hour. Hence, if you have several OST files, it will take months to import them.
Recommended Automated solution to import OST files
As previously stated, the Shoviv tool is examined by experts in many challenging scenarios, and it has become a data savior every time. Due to its convenient GUI and user-oriented nature, the tool is recommended for everyone, from tech-savvy to novice users.
Why Should You Go with the Shoviv OST to PST Converter?
- Import both types of OST files: We have coded the software with an advanced algorithm that effectively imports OST files into Outlook, even the orphaned OST files. Also, the software has no restriction on adding large and multiple OST files.
- Recover & preview corrupt OST files: If you have a corrupt OST file to recover and import, then the software is a blessing for you as it can recover the corrupted OST files effectively. Also, after the recovery of OST files, it displays a preview of every bit of the OST file so users can ensure their OST emails are correct before importing them into Outlook PST.
- Filter unwanted & duplicate emails: The software works in default duplicity prevention mode. Hence, if your OST files contain duplicate emails, Shoviv’s tool will automatically filter them. You also have a filter option to include/exclude unwanted items on the message class and date range-based criteria.
- No human error and data loss risk: Shoviv OST to PST converter tool automates the import process and eliminates data loss and human error. Due to its automation skills, the software is popular among novice users.
- Advanced Incremental Export: the software is boosted with the incremental export facility. It resumes the process from the last end and hence prevents duplicity.
How to import OST files into Outlook 2019, 2016, and other versions?
- Install and launch the Shoviv OST to PST Converter.
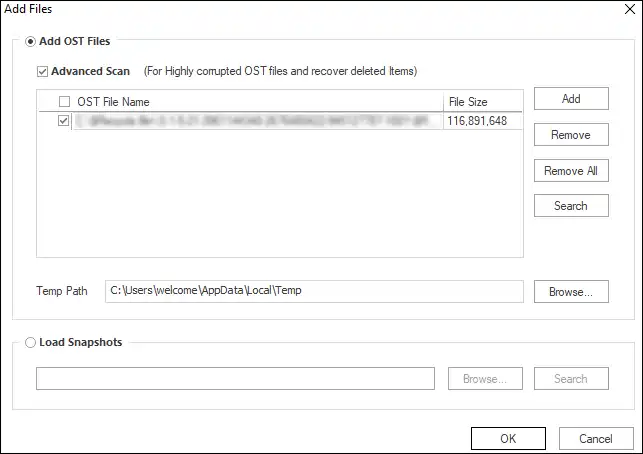
- Click on the Add OST file option from the ribbon bar and Add OST files. (Check the box adjacent to Advance Scan to repair severely corrupt OST files).
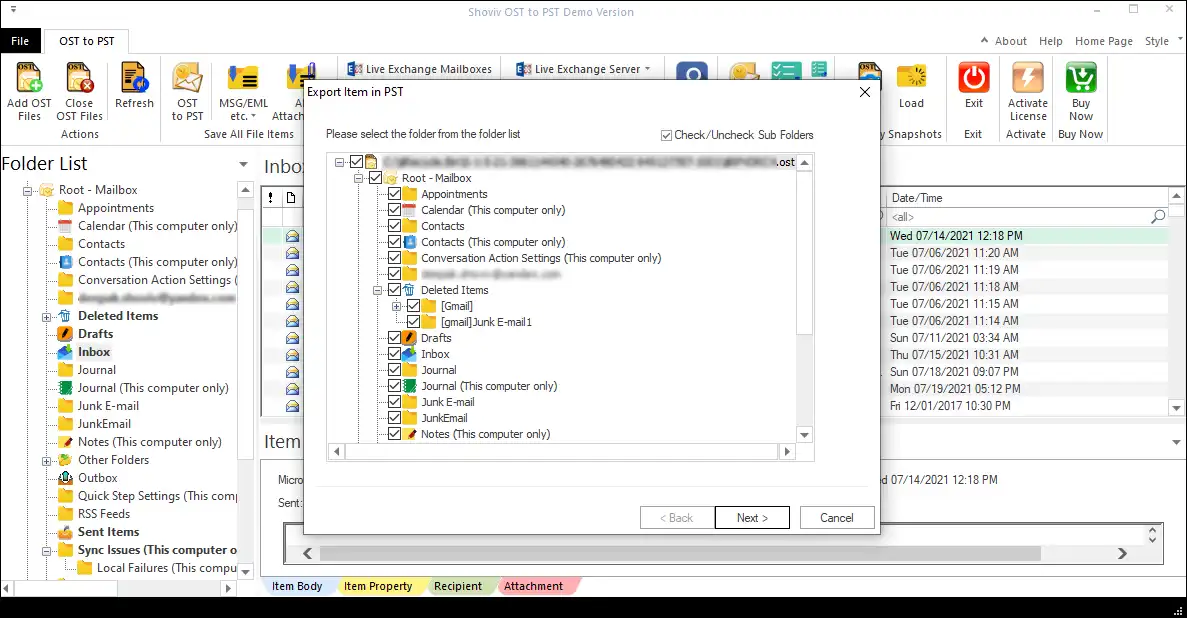
- Next, click the OST to PST option from the ribbon bar and check/uncheck OST items in the following wizard. Select Outlook folders to Export.
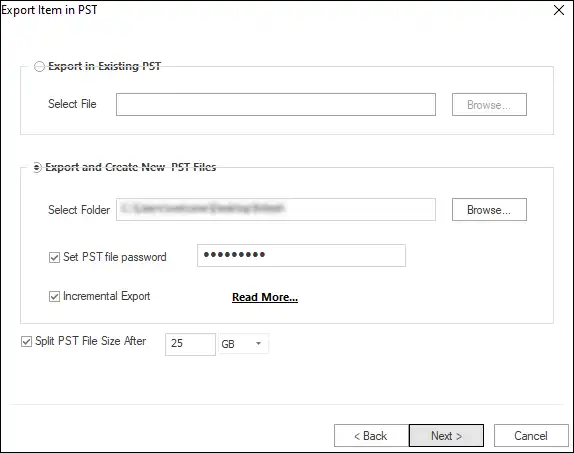
- Now browse the location to store the resultant PST file. You can also set a specific size and password for the resultant PST file.
- Apply Settings such as Password for PST and incremental Export, splitting PST.
- At last, the filter wizard pops up. You can filter out unwanted items; for other options, click the Advance option. Apply filter if needed.
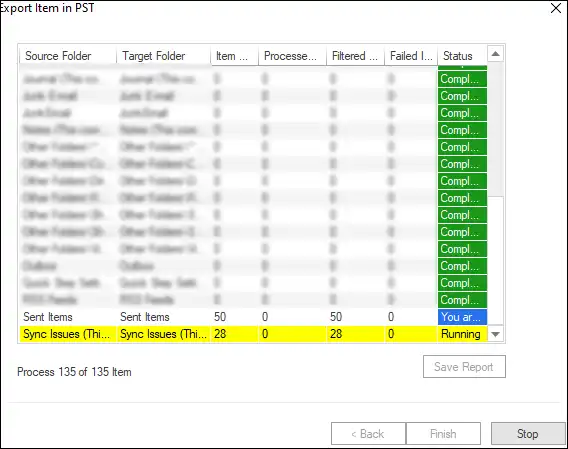
- Once the process is complete, click on the Finish.
After converting OST to PST the next step is to add PST file Outlook. Users can simply import OST to Outlook in this way by converting OST to PST and then adding .pst.
Final Words:
In this blog, we learned how to import OST file in Outlook and all the dimensions associated with this task. Also, we know that to import OST to Outlook, the first step is to convert OST to PST file format. We also learned manual ways for .ost to .pst conversion and the drawbacks associated with the manual conversion. A professional OST to PST Converter Tool is also described in this blog along with all its features. A free trial version of this tool is also available to download. Install and give it a try!
Frequently Asked Question
Ans. Follow the below steps:
- Install and open the Shoviv OST Converter.
- Add OST file >> “OST to PST option”.
- Choose the destination path and click Export.
- Open Outlook>File>Open &Export>Import/Export.
- Select “Import from a file” and select newly created PST.
Ans. Yes, you can access the OST file item in Outlook 2019, but for this, you first need to convert the OST to the PST file format. You can’t directly add OST to Outlook.
Ans. I’ve already mentioned above, use Shoviv OST viewer to open & view OST file without Outlook, even the corrupted ones. You can install and use the Shoviv OST viewer for free.
Ans. Manually, it is not possible to import OST file contacts. For this, you have to opt for Shoviv OST to PST converter; it imports every bit of OST files to Outlook PST.
Ans. Yes! The tool recovers corrupt OST files from all Outlook versions.
Ans. Shoviv knows businesspersons are moving into the cloud for better productivity, and that’s why we provide an option to import OST files directly into Office 365 mailboxes, public folders, and archive mailboxes.
Ans. Password protection: If your OST file is password-protected, you will need to know the password to access the data during the import process.
- How to Backup and Restore Emails in Webmail? - March 25, 2025
- How to Migrate Outlook to New Computer? - February 15, 2025
- Fix If Outlook Cannot Display the Specific Folder Location - February 1, 2025


