Getting a backup of Office365 Mailboxes sometimes becomes a very needy task. Because Office 365 doesn’t provide the backup of data in the local disk and the PST becomes the first choice to having the Backup. There may be a lot of reasons for the backup in PST from Office 365 Mailboxes:
Reasons- Backup in PST from Office 365 Mailboxes
- One of the common reasons behind the backup is reducing the size of Office 356 by having a backup of Office 365 mailboxes into the PST format.
- By having the backup of Office 365 Archive mailbox in PST, the user can save it into local disk and can use it whenever needed.
- Office 365 stores data in Cloud and it is universally accessible as well as it is also under the threat of unauthorized access and hacking.
- To retrieve data in case of accidental deletion and data loss, having a backup is the best practice.
Download a trial version of Shoviv Office 365 Backup and Restore to know in a better way.
How to Backup in PST from Office 365 Mailboxes?
The Backup of Office 365 mailboxes to Office 365 can be done by the manual as well as professional third- party tool. Let’s know about them:
Manual Method Steps:
- Firstly, log in to MS Office with administrator credentials.
- Go to Admin>Exchange
- Click Permissions which is at the left pane, then move to Admin Roles>> Discovery management.
- Now click (+) sign to add Roles.
- Proceed by clicking “Mailbox Import/Export” below the roles.
- Now under the members, again click on the (+) sign and click once on the name of the user.
- When necessary steps are done, click on Save.
- Now follow the direction, go to “Compliance Management >>in-place eDiscovery & hold” and click on the New (+)
- At the “In-Place eDiscovery and Hold” dialog box, type the name and click on the Next button.
- After that select all mailboxes by clicking on the “Search all mailboxes” option or the chosen ones by the “Specify mailboxes to search” option and adding the “+”.
- From the search query screen, click on the Next button, before it set the filters.
- Now from the dialog box “In-Place Hold setting”, you have to estimate the days till which data has to store in the server before it deletes.
- When done, click on the “Finish”.
- In the end after getting the confirmation message click the “Close”.
- After the completion of the process, now by clicking the download arrow, you can take backup into the PST file.
Check Out Our Latest Arrival On
https://www.shoviv.com/blog/all-you-need-to-know-about-office-365-backup/
Drawbacks of Manual Method:
- The Manual way of having the backup of Office 365 mailboxes into the PST is very lengthy and time-consuming.
- The manual method fails to backup the selective data such as emails, calendars, and contacts.
- It doesn’t guarantee the accurate and full backup of mailboxes without altering the data.
- The manual method asks for the technical expertise to run the process.
Professional Third-Party Tool
The Professional tool to backup in PST from Office 365 mailboxes comes with a lot of user-centric features. Shoviv Office 365 Backup and Restore Software is a handy tool for professionally having a backup. Let’s know about its features:
- Shoviv Office 365 Backup and Restore Software takes backup in PST files which can be open and previewed into any Outlook version.
- The software smoothly provides a backup of User mailbox, Archive mailbox, and Public Folders.
- It has many user-centric features for example Full Scheduled Incremental Periodic backup and filter option.
- The software works concurrently and it can run multiple jobs at a time.
- It also provides the feature to restore backup files to Office 365 mailboxes effortlessly.
- The software also provides a report on the whole process.
How does it Work?
The software is built with a user-friendly GUI, so running it is very easy, even a novice and non-technical users can effortlessly take backup in PST from Office 365 Mailboxes.
Step 1. Install and launch the software.
Step 2. Create a connection project to connect Office 365 user mailboxes, after that fetch users’ mailboxes list by clicking on the connect button of the left ribbon bar of the Connect Office 365 tab. 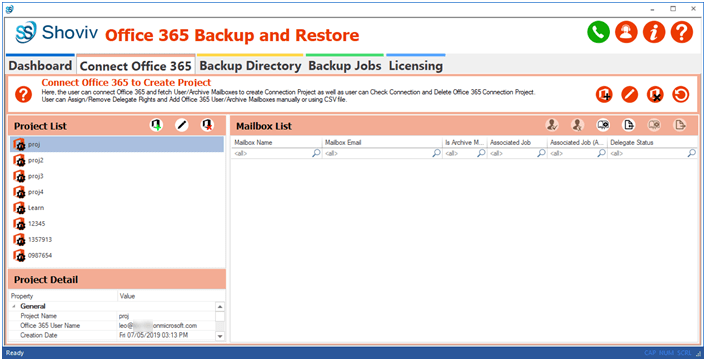
Step3: A new dialog box will appear, enter the required credentials of office 355 admin user and click connect. 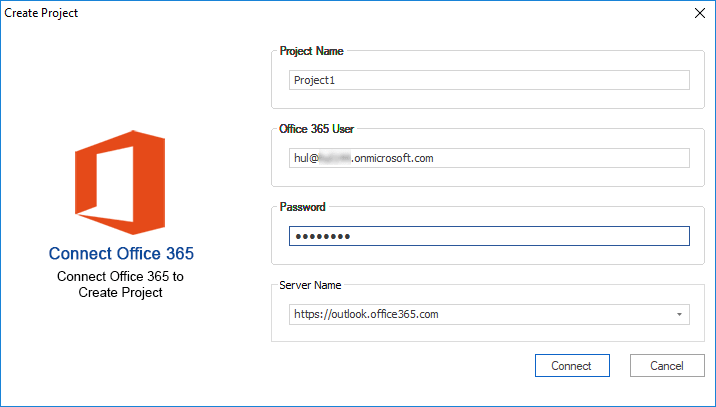
Step 4: Create a new backup directory to store the backup data of Office 365 Mailboxes, click on theAdd icon from the Backup Directory tab. 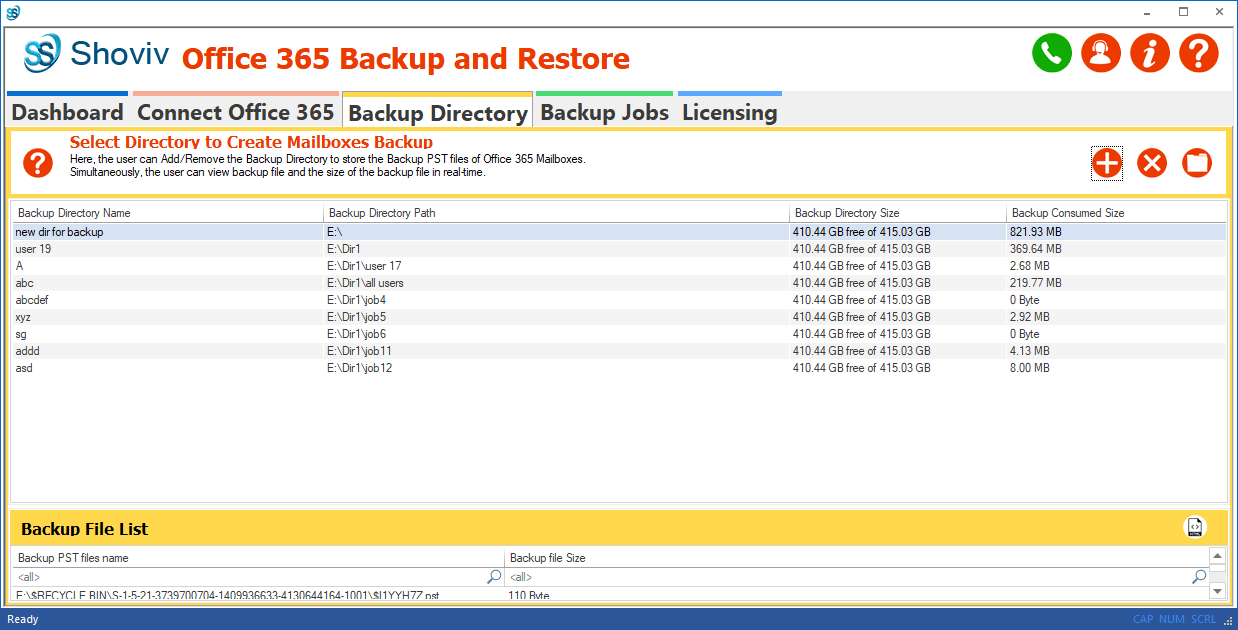
Step 5: Enter the name of the directory and browse the directory/folder path where you want to store the backup files of Office365 mailboxes. 
Step6: To create a new backup job, click on the Add button of the description toolbar of the Backup Jobs Tab. By doing this a dialog box will open, provide the asked details. When done, click the Next. 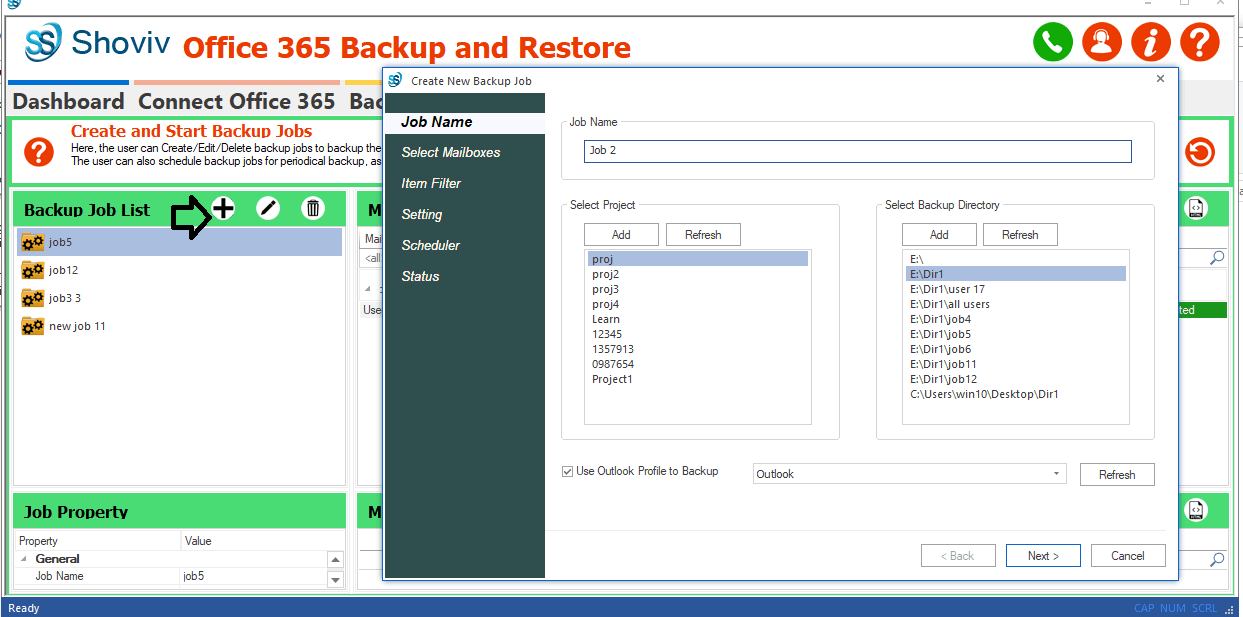
Step 7: Here, the user can choose the mailboxes whom he/she wants to backup, as well as user, can also choose whether he/she wants the backup of general mailboxes or archive mailboxes or of both. When selection is done click the Next. 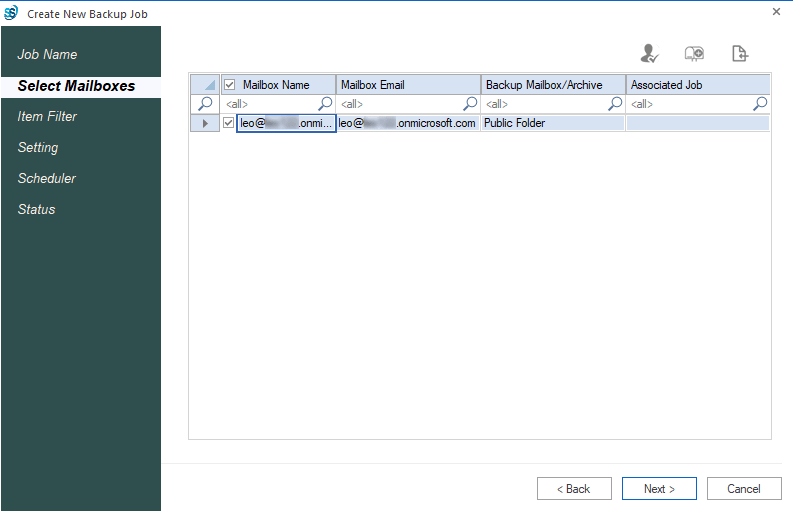
Step 8: By clicking next, the user will be prompted to the Filter page. Here three filter options are given: Message Class, Date Range, and Folder Filter. Choose as per the requirement and click Next. 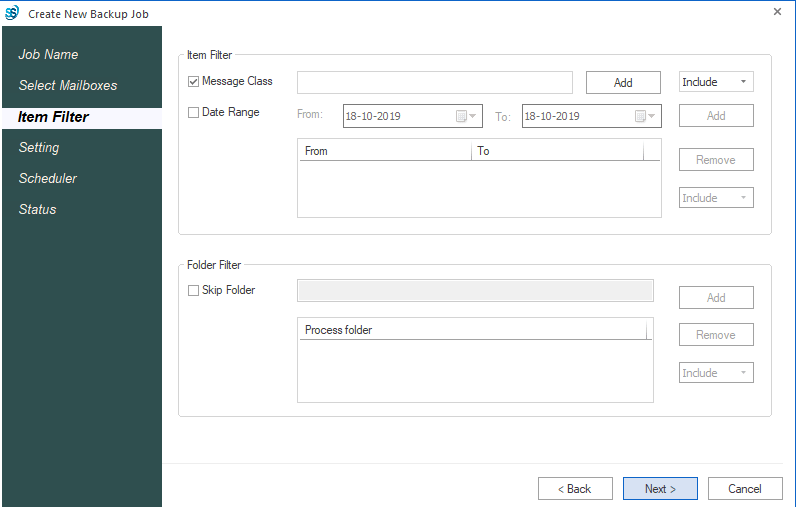
Step 9: After applying the filter user will be promoted to the setting dialog. Here user can set Backup thread counts for Mailbox and Item as well as user can set Office 365 Connection and Other MAPI Connection attempts in case of network failure. After applying the setting click the Next. 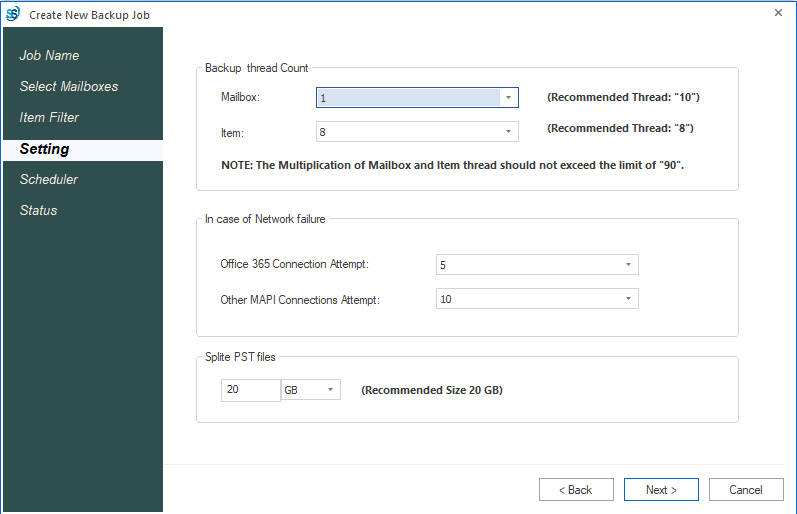
Step 10: The user will be prompt to the next window, where two options are given. One asks for immediate and another for a scheduler. Here, the user can set a periodically backup process and set the Starting time for the automatic backup job or can opt one for a run immediately. The users have the option to choose One Time, Daily, Weekly, and Monthly. 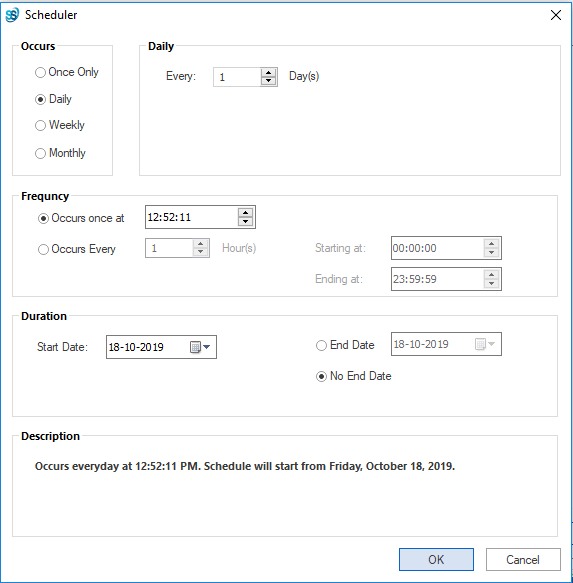
Step 11: Now the status of the created backup job will be displayed. If the report is the satisfactory user can click Finish moreover if want to edit can do by going back. 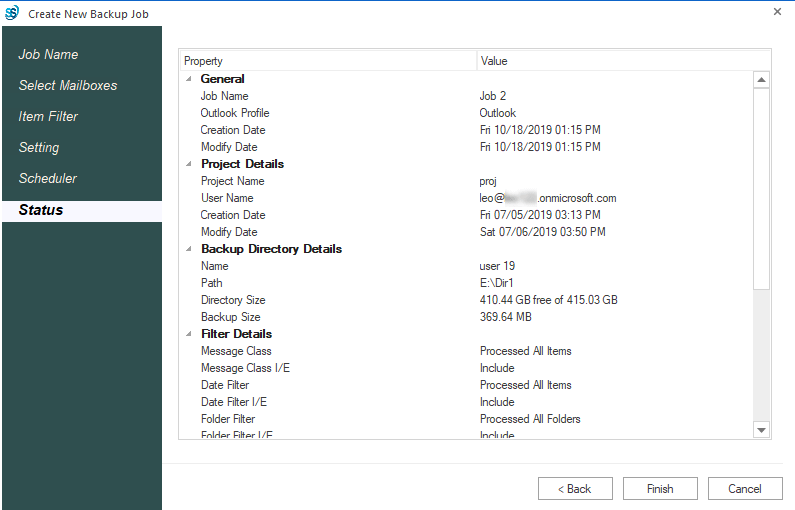
Step 12: By clicking finish, Mailbox’s Backup Report will display. 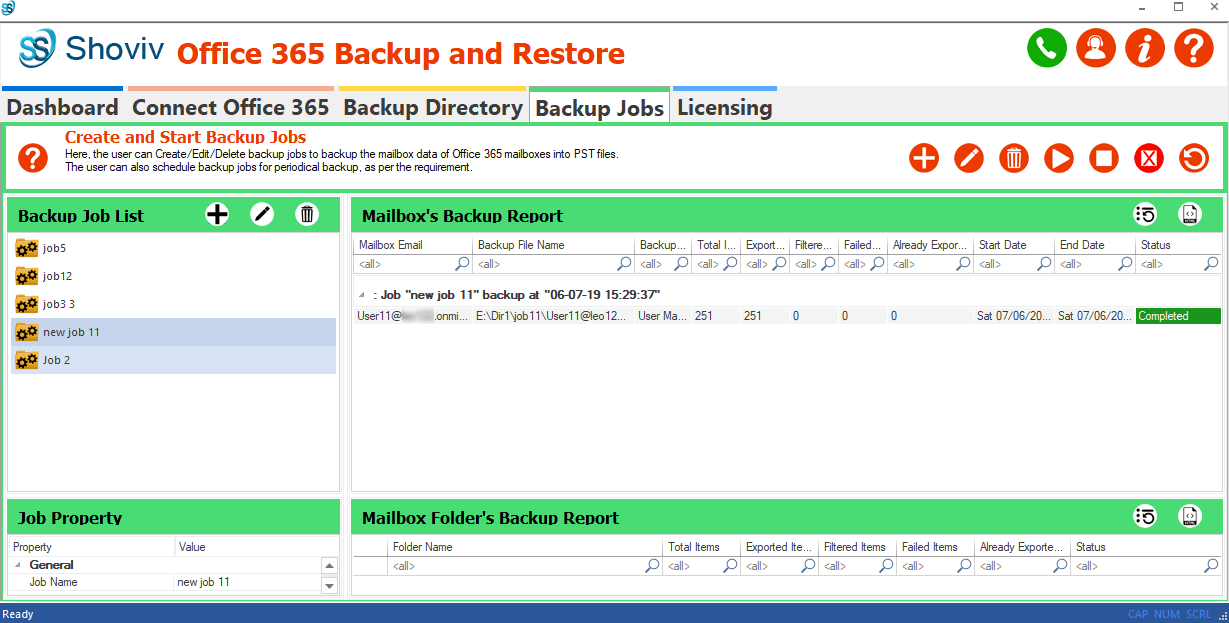
This is how one can easily and accurately get backup in PST from Office 365 mailboxes with the help of professional Shoviv Office 365 Backup and Restore Software.
Wrapping up:
To get backup in PST from Office 365 Mailboxes we saw both manual method and third-party tool. Now we can conclude that the manual method is long, time-consuming, and with limitations while Shoviv Office 365 Backup and Restore Software provides the easiest and accurate professional way for backup in PST from Office 365 mailboxes.
- How to Backup and Restore Emails in Webmail? - March 25, 2025
- How to Migrate Outlook to New Computer? - February 15, 2025
- Fix If Outlook Cannot Display the Specific Folder Location - February 1, 2025


