Several reasons are initiating for the Exchange Online Migration to PST. Exchange Online is the hosted version of Microsoft’s Exchange Server messaging platform. Exchange Online Provides a cost-efficient way to small companies and organization by facilitating the same benefits as On-premises Exchange deployment does.
Download a trial version of Shoviv Exchange Online Migration to PST to know in a better way.
For What Exchange Online Migration to PST?
Here are some valid reasons for the Exchange Online Migration to PST. The most common reason is having the backup of mailboxes in the PST format to reduce the size. Other are:
- By migrating Exchange Online’s Archive mailboxes to PST, User can reduce the size of mailboxes and save them into Local disk and can use it whenever is required.
- PST files are easy to port, by migrating mailboxes to PST, it will be easy to migrate them somewhere else where needed.
- As Exchange Online is reliable for the data security still unauthorized excess and illegal hacking can’t be denied and accidental deletion and data loss can be happened by anyway. So, to escape out from such possibilities migration in PST is a wise decision.
Ways to do Exchange Online Migration to PST:
For Exchange Online Migration to PST here are both the manual as well as professional methods. The professional method uses Third-part tool to professionalise the process.
- Manual Method:
Using eDiscovery:
- Login with the administrator credential
- Follow Admin>Exchange
- From the left pane click on Permission, then Admin Roles>>Discovery management.
- Click on (+) sign to add Roles.
- Click on “Mailbox Import/Export” beneath the roles.
- Under the members, click on the (+) sign and Click on the name of user.
- When all done, click on save.
- Now go to the “compliance management >>in-place e-Discovery & hold” and click on the New (+).
- Type the name at “In-place e-Discovery and Hold” dialog box and click on the Next.
- Select mailboxes by clicking on the “Search all mailboxes” option or choose by the “Specify mailboxes to search” option and adding the “+”
- Now set the filters and from the search, query screen click on the
- From “In-Hold Place setting”, provide the days till when data will be stored in the server before getting deleted.
- After completing, click on the “Finish”.
- After getting Confirmation message click on the Close.
- After completing all, by clicking download arrow you can migrate mailboxes to PST.
Drawbacks of Manual Method:
Manual Method provides a way to Migrate Exchange Online mailboxes to PST but it is not a professionals’ way. The Manual method comes with the limitations like:
- Manual Method fails in migration of selective data like calendars, contacts, email et cetera.
- It is a very time-consuming way and also it asks for the technical expertise to complete the task.
- It doesn’t guarantee the perfect and accurate migration; always chances of data alteration.
Due to these limitations, the manual method is not an appropriate method for the Exchange Online Migration to PST.
- Professional Method:
Using Third-Party tool (Shoviv Exchange Server Suite)
Step 1: Install and Launch the Shoviv Exchange Server Suite.
Step 2: Click on the Add Source button of ribbon bar or make a right-click at Source list and click on Exchange Server Mailboxes. 
Step 3: Provide the asked details i.e. Domain IP, User Name and Password. Click the Next button. 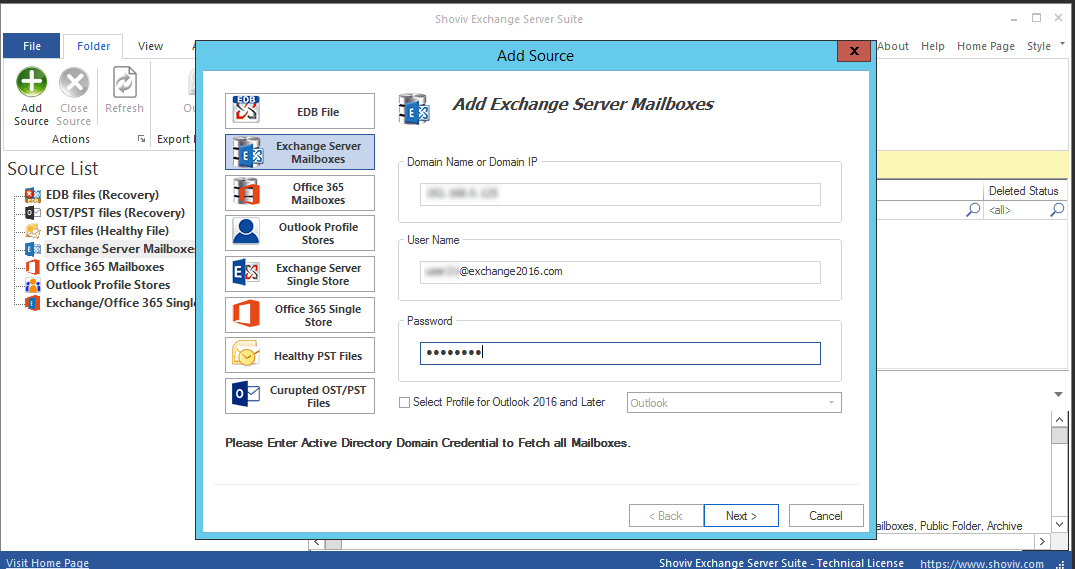
Step 4: Select and Check the mailboxes that have to Migrate in PST. Click Finish. 
Step 5: Now you can see the list of Exchange Server Mailboxes in the Source list. You can also see the content within the mailboxes by expanding them. 
Step 6: Next step is to Check/Uncheck Subfolders. Check the selected folders from the folder list. Click the Next. 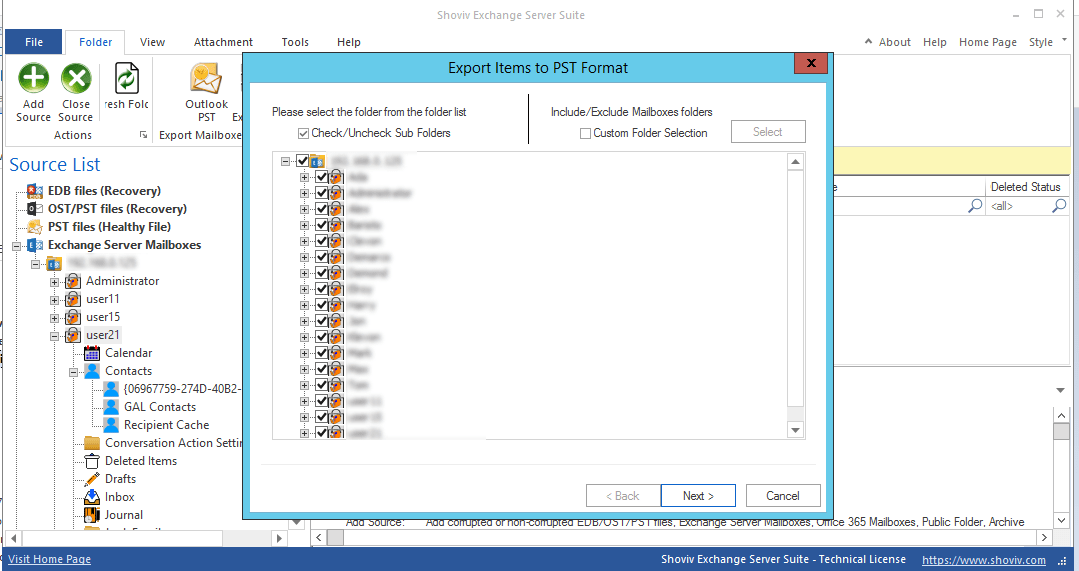
Step 7: Next step is for the applying filters. Apply the filter based on Process Message Class and Process Item Date. Apply as per the need and Click on the Next. 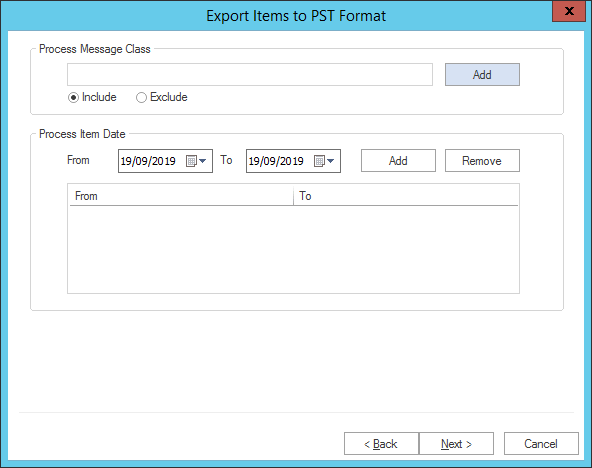
Step 8: Here you can select if you want to export in Existing PST or want to create and Export in New PST. You can also set a password for PST file. An Option to set PST size is also given, after which the resultant PST file will split. 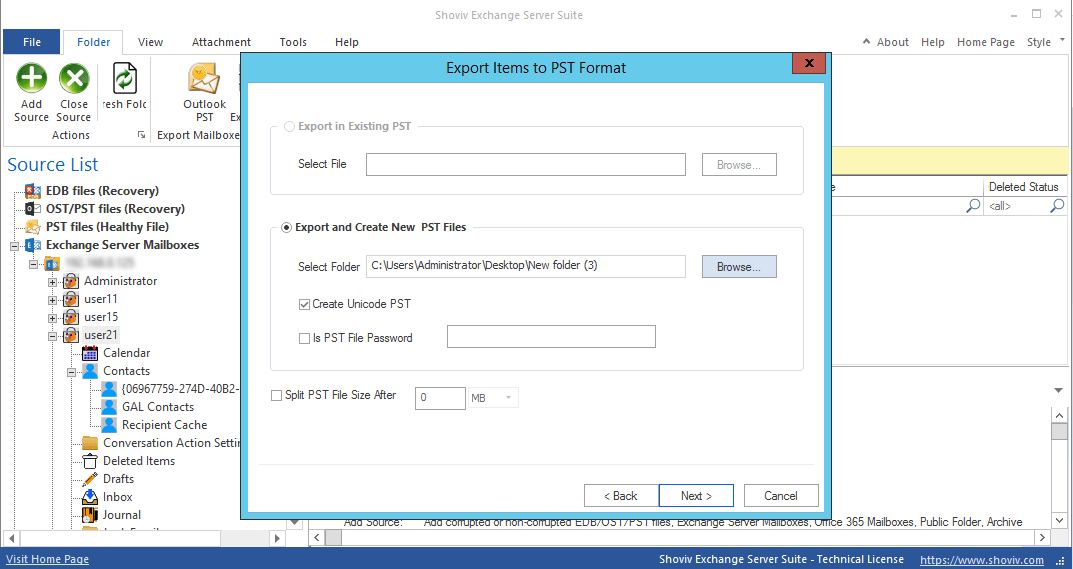
Step 9: Here Status of the process will display. A message will appear after the completion of the process to inform you. You can also save the report by clicking on “Save Report”. Click on the Finish when all is done. 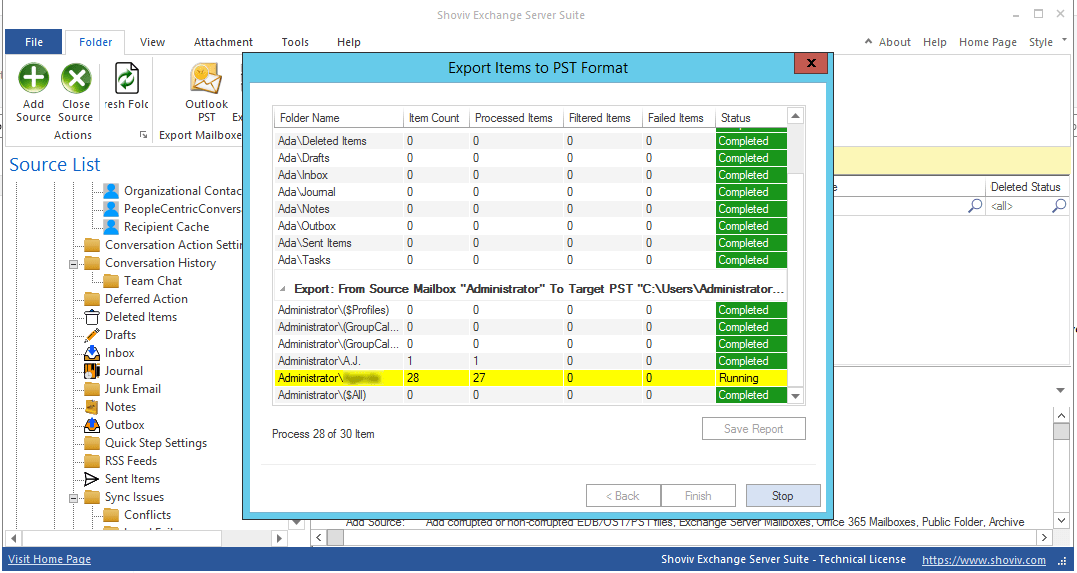
What other features Exchange Server Suite Offers?
- Shoviv Exchange Server Suite is a multitasking and multipurpose tool and it allows to Add EDB file, Exchange Server Mailboxes, Office 365 Mailboxes, Outlook Profile Stores, Exchange Server Single Store, Healthy PST and Corrupted OST/PST file as a source.
- Shoviv Exchange Server Suite provides complete recovery of EDB, PST and OST Files.
- The Software allows splitting resultant PST into small user-given sizes.
- Feature of e-Discovery allows the users to search particular item based on subject name, sender name, recipient name, date criteria et cetera.
- Option to filter and facility to preview is also available in the software.
- Mailbox Mapping at the time of export is also available in the Shoviv Exchange Server suite.
Final Words:
Exchange Online Migration to PST is an essential task for which a number of reasons are initiating. For this user have manual way as well as Professional way. Manual method i.e. e-Discovery comes with the limitations and not provides a professional way to do the task. Due to the limitations of manual method use of the third-party tool for the Exchange Online Migration is a must to do a thing. Shoviv Exchange Server Suite is an advanced software which is embedded with the many user-oriented features. The free demo/trial version of the software is also available to check its processing which allows migration first 50 items per folder.
- How to Export Calendar from Outlook on Microsoft 365? - April 15, 2025
- Understanding Yahoo Mail Storage Limit & Back-Up Process! - April 10, 2025
- Mailspring vs Thunderbird: The Ultimate 2025 Showdown - April 3, 2025


