Microsoft Teams is one of the productive applications of the Microsoft 365. It saves a lot of valuable information for users or businesses. When working on the Microsoft Team, users sometimes need to archive, restore, or delete Microsoft Teams chats for various reasons. If you are one of the users who want a detailed guide on how to archive, restore, and delete Team chats, this article will teach everything in a stepwise manner.
These processes (archive, restore, or delete) need to be executed accurately to securely restore, delete, or archive MS Team chats. Here, users will get the stepwise working of the solutions to perform these tasks in a simplified and reliable way. Let us begin this blog by understanding how to archive Microsoft Teams chats.
What are the possible ways to archive Teams chats?
Here, we will cover two methods; the first is using the Microsoft Teams Administrator, and the second is using the PowerShell commands to archive Microsoft Teams chats. We suggest users understand and take each step carefully for a hassle-free Microsoft Teams chat archiving process.
1. Archive Microsoft Teams using the Teams Administrator:
The steps are given below; follow them carefully for Microsoft Team archiving successfully:
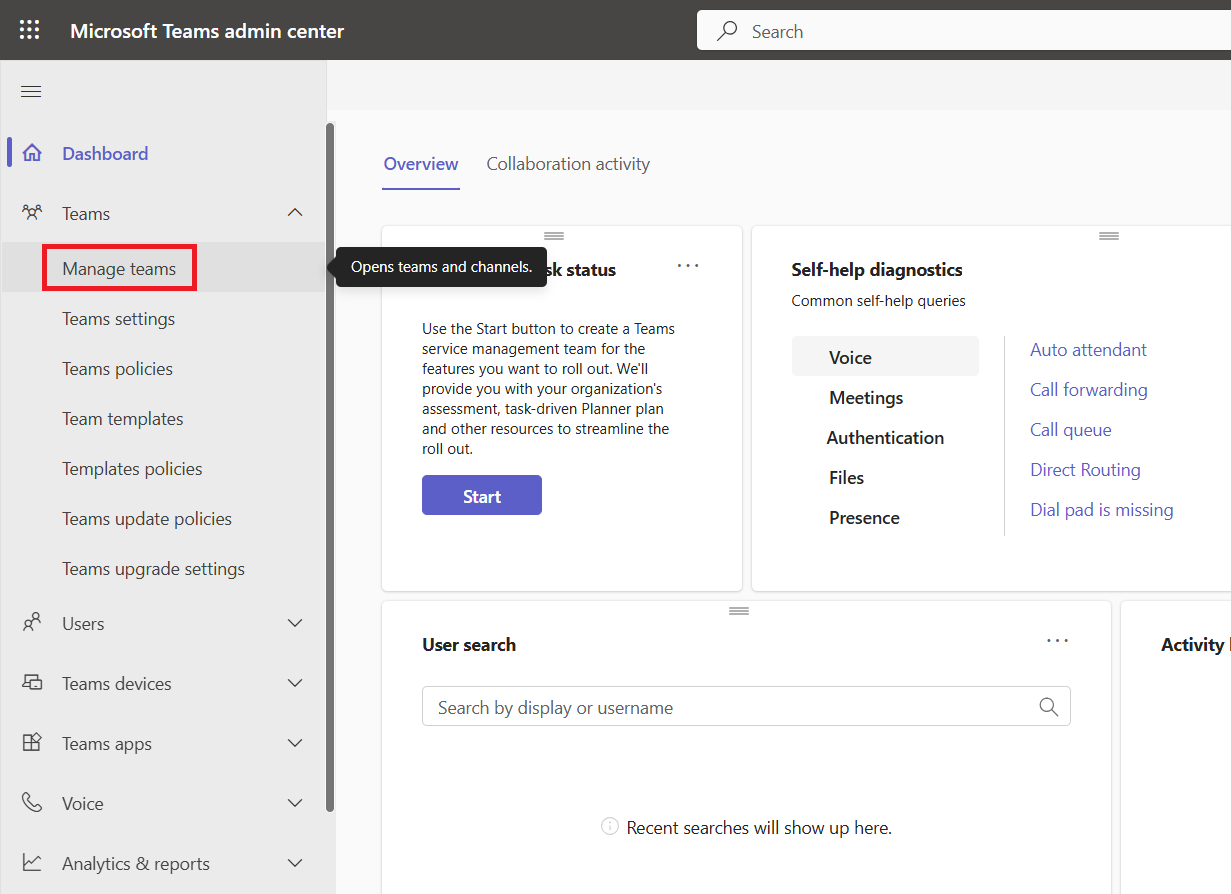
- First, open the Office 365 Admin Center and hit the Teams tab to open Teams Administrator.
- Then, expand the Teams section and click the Manage Teams option.

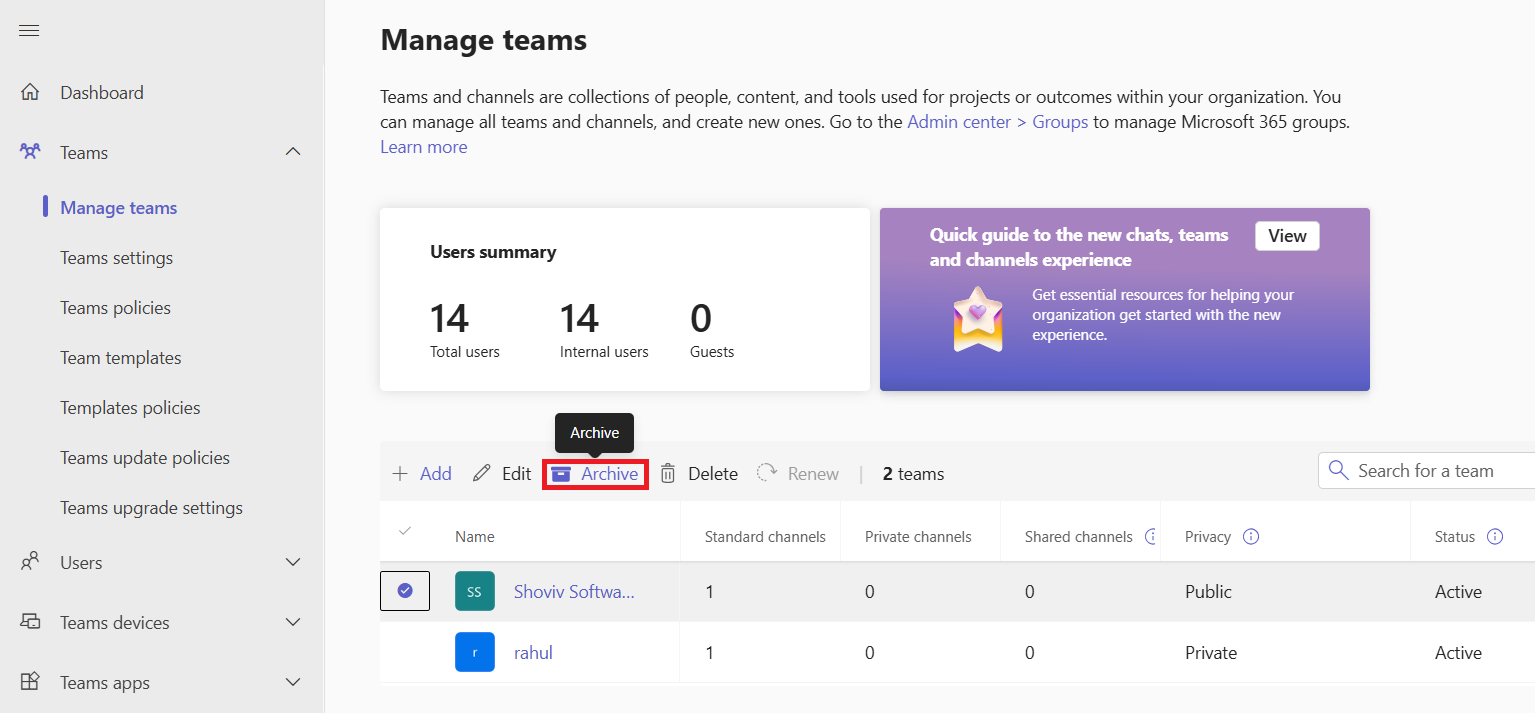
- Choose a team from the list you want to archive and tap the Archive.

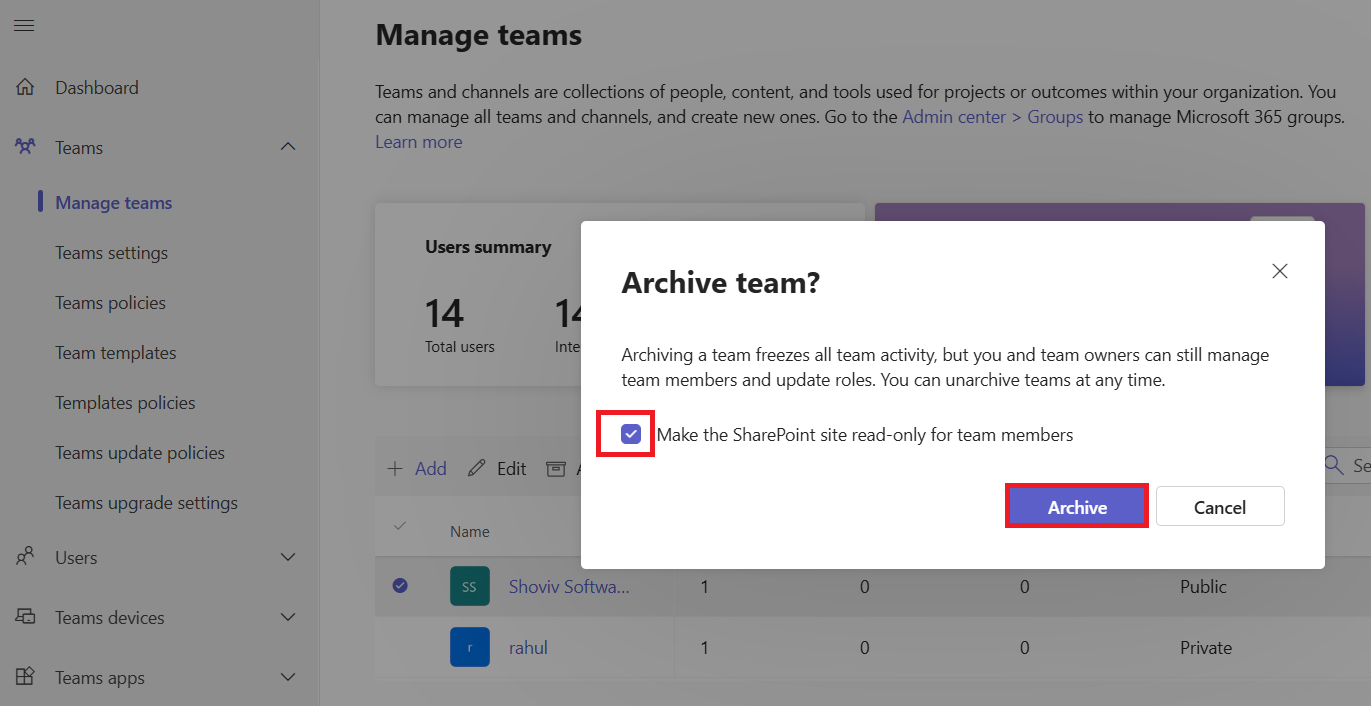
- After that, tick the “Make the SharePoint site read-only for team members” option and hit the Archive button.

- When you are done, the status of the Team will be changed from Active to Archived.
That is how users can use the Teams Administrator to archive Microsoft Teams chats using a few simple steps.
2. Windows PowerShell to archive Teams:
Now, we will learn a few PowerShell commands that will help us archive Teams chats. Users must go through the instructions below to complete this task with ease.
- Start with installing the Microsoft Teams PowerShell Module using the command below.
Install-Module -Name PowerShellGet -Force -AllowClobber
Install-Module -Name MicrosoftTeams –Force
- Then, you need to use the following command to connect to Microsoft Teams.
Connect-MicrosoftTeams
- Next, follow the command below to archive Teams. (Replace <Team ID> with the actual Team ID)
Set-TeamArchivedState -GroupId <TeamID> -Archived $true
It is done with the Microsoft Teams archiving task using the PowerShell commands. If you want to unarchive the teams in the future, use the command below:
Set-TeamArchivedState -GroupId <TeamID> -Archived $false
As we discussed how to archive Microsoft Teams chats using two solutions, we will now know the practices for deleting Microsoft Teams chats.
Proven Solutions to delete Microsoft Teams Chats for everyone and individual
This section will share the detailed procedure for deleting Microsoft Team chats for individuals and everyone on web, desktop and mobile apps. First, we will give steps to delete a single message, and then we will begin exploring how to delete entire conversations for each and every one of you.
1. Delete a single message for an individual or yourself
We will first share how users can delete a single Microsoft Team message on the web/desktop for individuals. The following steps are needed to be applied to do so.
For Web/Desktop Microsoft Teams:
- Open Microsoft Teams on the Web or Desktop.
- Go to the Chat from where you want to delete your message.
- After that, glide over the message.
- Tap the three dots or use the More option, which is next to the message.
- Then, click the Delete button.
- The message will be deleted.
For Mobile Application:
- Launch the Microsoft Team app on your Mobile.
- Then, go to the Chat where you sent the message.
- Long press on it and click the Delete button.
- The message will no longer be in the Chat.
2. Steps to delete entire chats for individuals
First of all, let us clarify that it is not possible to delete entire Microsoft Team chats; instead, you can hide them for yourself. We will be learning two procedures in this section to hide or delete Microsoft Team chats for individuals on the Web/Desktop or Mobile. Let us understand both solutions and hide the chats that you no longer need.
For Web/Desktop Team Chats:
- Open Microsoft Teams and access the Chat you want to remove.
- After that, float the cursor on the Chat in the left pane.
- Now, you will see three dots next to the Chat.
- Afterward, click on the three dots and choose the Hide button.
- This will hide entire chats from your end but not delete them for everyone.
For Microsoft Teams chats on Mobile:
- Go to the Microsoft Teams app.
- Then, select the Chat tab.
- If you are using iOS, swipe left. Or, if you are using an Android device, long press on the Chat you want to remove.
- After that, click the Hide button.
3. Delete Microsoft Team chats for everyone
Only Admins can delete Microsoft Team chats for everyone. To do so, the Admin role is required. We will cover this procedure in two phases. In the first phase, we need to enable message or chat deletion for everyone, allowing Admins to delete chats or messages for everyone.
In the second phase, we will share how Admins can use Office 365 Purview Compliance Center to delete messages for everyone.
Phase 1: Enabling Message or Chat Deletion for Everyone
- Go to the Microsoft Teams Admin Center and log in with your admin account details.
- Then, select the Messaging Policies from the left menu.
- Now, edit the existing policy or click the Add button to create a new policy.
- After that, find the Owners can delete sent messages option and enable it.
- Once you created the new policy, please select it and assign the policy to the users or groups. To do this, click Manage Users and add the users or groups.
- Lastly, save the changes. The policy may take up to 24 hours to apply.
Phase 2: Delete Chats or Messages using the Compliance Feature
- Launch the MS PowerShell on your PC.
- Then, install the Compliance Module using the below command.
Install-Module -Name ExchangeOnlineManagement
- Thereafter, connect and import the module using the following command.
Import-Module ExchangeOnlineManagement
Connect-IPPSSession
- Now, you need to create a Compliance Search. (Replace kind:im with the keyword or sender to get accurate results.)
New-ComplianceSearch -Name “DeleteTeamsMessages” -ExchangeLocation All -ContentMatchQuery ‘kind:im’
- Then, use the command below to start searching for the message to delete.
Start-ComplianceSearch -Identity “DeleteTeamsMessages”
- Delete the messages or chats based on the search with the help of the command shared-downward.
New-ComplianceSearchAction -SearchName “DeleteTeamsMessages” -Purge -PurgeType SoftDelete
This will remove the message and move it to the Recycle bin. If you want to delete the messages or chats permanently, type the following command and press enter.
New-ComplianceSearchAction -SearchName “DeleteTeamsMessages” -Purge -PurgeType HardDelete
We have understood the procedure for archiving and deleting Microsoft Teams. The following section will provide you with a detailed guide on ways to restore Microsoft Teams chats or messages.
Instant approaches for restoring Microsoft Teams
Users will learn the various tricks to restore Microsoft Team chats for individual users and Admins here. There are different processes, depending on the scenarios, such as if the Teams chat is soft deleted, hidden, or hard deleted. Let us closely understand the detailed stepwise guide on each solution to restore Teams chats or messages.
1. Restore Hidden chats from Microsoft Teams for individual users
If the chats are not deleted, only hidden from Microsoft Teams, you can follow the steps below to restore hidden chats.
- Open Microsoft Teams on the Web, Mobile app or Desktop.
- Go to the Search bar and type the name of the user or group whose Chat you want to restore.
- The search results will appear. Then, you need to select the Chat.
- Now, you can continue the conversation if the chat is hidden and not deleted.
2. Restore Soft Deleted Teams chats for Admins or Assigned Users
To restore Microsoft Teams chats, if they are soft deleted or in the retention period, we need to use the Microsoft Purview Compliance Center.
- Navigate to the Microsoft Purview Compliance Center and log in using the admin email account.
- After that, move to the eDiscovery and hit Content Search.
- Then, start a search query by clicking the (+) New Search.
- Now, select the Exchange option (this includes Microsoft Team data).
- Search by using keywords, date, sender/receiver, etc., to define your query.
- Now, it will begin searching across the Teams chats according to your specified keyword or query.
- Once the Search process is completed, tap the Export button.
- After that, download the results to restore the Microsoft Teams chat history.
3. Entire Microsoft Teams restoring for Admins Only
Sometimes, users delete entire Teams that store chats you want to restore. In that case, users can follow the guide below and restore entire Microsoft Teams.
- Open the browser and move to the Team Admin Center.
- Log in using the Admin credentials.
- From the left menu, choose Teams and click the Manage Teams option.
- Then, locate the Deleted Groups section and select the Team you want to restore.
- Click the Team and hit the Restore button.
- Once done, the deleted Team will be restored, and you can access the deleted channels and chats.
4. Compliance Feature to restore Chats (Admins)
Here, we will use the PowerShell commands to restore Microsoft Teams chats if your organization has a data retention policy.
- Launch Microsoft PowerShell on your device.
- Install the Exchange Online Module using the following command.
Install-Module -Name ExchangeOnlineManagement
- After that, connect to the Security & Compliance Center using the command below.
Connect-IPPSSession
- Run the New- Compliance Search command search for deleted Teams chats.
New-ComplianceSearch -Name “SearchDeletedTeamsMessages” -ExchangeLocation “All” -ContentMatchQuery ‘kind:im’
- Then, begin the search using the command shared below.
Start-ComplianceSearch -Identity “SearchDeletedTeamsMessages”
Once done, export the results to restore deleted Microsoft Teams chats.
5. Restore Teams chats from the Backup
Backup will help users restore their deleted Microsoft Teams chats if the above solutions fail to restore chats. If you have used third-party tools, like the Shoviv Cloud Drive Migrator, to backup Microsoft Teams chats, you can quickly restore deleted chats. However, if you don’t have any backup, it might be impossible to restore the Teams chats. Let us explore more features of this professional software.
- This tool effectively backs up all data from Microsoft OneDrive, such as documents, files, folders, Teams chats, etc.
- Additionally, it is easy for users to use this tool, as it comes with a simple user interface.
- This Microsoft Teams Backup Tool also allows users to schedule the backup task on a regular basis, like daily, weekly, or monthly.
- Moreover, it allows users to effortlessly complete the backup of the Microsoft Teams to the local drive.
- This tool also has a free trial version, which users can use to process the items up to 20 kb in size to the target.
Bringing All to a Close!
This blog has taught various solutions to archive, delete, or restore Microsoft Teams chats in a smooth environment. This closing section advises users to try these ways to restore, delete or archive Teams chats effectively. Moreover, if users want to restore data, but the chats get hard deleted, and the above solutions fail to restore, they will not be able to restore chats. To avoid such situations in the future, try the Shoviv Cloud Drive Migrator (Microsoft Team Backup Tool) to keep the Teams chats backup in the local drive and restore them when needed.
- How to Import or Export Contacts in Any Outlook Version? - March 31, 2025
- Understand Groups & Permissions on a SharePoint Site - March 21, 2025
- My Outlook Emails are Stuck in the Outbox! What’s Going On? - March 12, 2025


