There are many scenarios when Exchange online users need to access other users’ mailboxes, most frequently in migration and sending an email on someone else behalf. For this, several users are using PowerShell’s “Add-Mailboxpermission” script. However, it is not as easy as it sounds because one is recommended to have the technical expertise to use the PowerShell.
This write-up will mention all the Add-Mailboxpermission syntax to grant or limit access to Exchange Online mailboxes and Office 365 mailbox delegation process.
Use Exchange Online PowerShell to delegate mailbox permissions
Before assigning the mailbox permission, let’s know briefly about its types. Basically, in a server, there are three types of permissions, which goes as follows:
Send As: When someone with this permission sends an email, it appears to the recipients as if it was sent by the group rather than the individual user.

Send on Behalf: As the name indicates, by this, you can grant the user to send emails on someone’s behalf.

Full Access: Allows a user to behave as the mailbox’s owner. The user can read, edit, and create emails, as well as tasks and calendar items.

Before starting with the PowerShell cmdlet, you first need to connect to remote PowerShell. For the same, run the following 3 commands.
$o365cred=get-credential

$Session = New-PSSession -ConfigurationName Microsoft.Exchange -ConnectionUri https://ps.outlook.com/powershell/ – Credential $o365cred – Authentication Basic – AllowRedirection

Import-PSSession $session
Office 365 Mailbox delegation using PowerShell
Now the PowerShell’s work gets started, let’s start with the simplest one. We’ll grant Hitesh full delegates of Neagoe’s mailbox in the first command.
Add-MailboxPermission -identity Neagoe@www.shoviv.com – user Hitesh@www.shoviv.com – AccessRights FullAccess
Now we’ll assign full access to all mailboxes of an environment to Hitesh
Get-Mailbox | Add-mailboxpermission -user Hitesh@www.shoviv.com -AccessRights FullAccess
Next is removing the Mailbox delegates after the task gets accomplished
Remove-MailboxPermission -Identity "Hitesh" -User "Neageo" -AccessRights FullAccess -InheritanceType All
Add-mailboxpermission multiple users full access within an organization
Get-Mailbox -ResultSize unlimited -Filter "(RecipientTypeDetails -eq 'UserMailbox') -and (Alias -ne 'Admin')" | Add-MailboxPermission -User admin@Shoviv.com -AccessRights FullAccess -InheritanceType All
These are the PowerShell cmdlet by using which you can do Exchange online/Office 365 mailbox delegation. These commands basically come in handy when migrating a user/mailbox from Exchange online. But before you start working with them, I suggest you use these commands only if you’re techy or at least have any tech geek in your team.
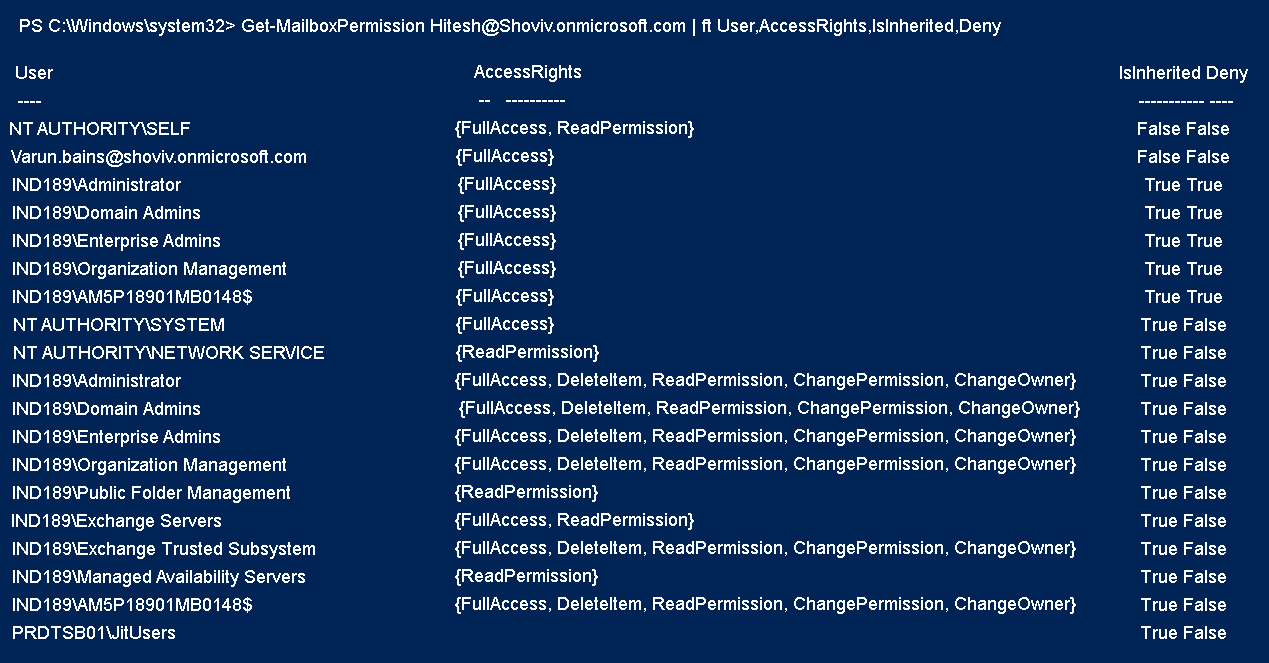
To review your change, use Get-MailboxPermission. The output will look similar to the following:

Alternative to Add-mailbox permission in Exchange online
Migration towards advanced or backup purposes is obvious, and a great thing like no one wants to stay behind in this day-by-day advancing era.
Since the release of Cloud (Office 365), several users have moved to it from Exchange online. For this, they have to assign full access to the administrator, where the Add-mailbox permission comes in handy. But as you can see above, it is not an easy task, especially if you’re thinking of migrating the complete Exchange online environment to Office 365 manually; it’ll be like the river of fire and the departure of Die.
Fortunately, Shoviv software, a well-known name for providing an automated email migration solution, provides Exchange Recovery Manager Tool to migrate Exchange online to different targets. Let’s dig a bit deeper.
Shoviv Exchange Recovery Manager: Alternative for Add-Mailboxpermission
Shoviv is a renowned name for providing automated solutions for Exchange Online, Office 365 and other email clients. We know that providing advanced solutions means nothing if it is complex to use, and that’s why Shoviv’s solutions are advanced as well as convenient.
Shoviv Exchange Recovery Manager is a one-stop solution for Exchange and Office 365 administrators as it comes in several scenarios.
Scenarios where Shoviv Exchange Recovery Manager Usage is recommended
First, let’s look for Exchange environments where you can use Shoviv Exchange Recovery Manager.
Exchange Environments
- Exchange to Exchange Migration (All versions)
- Office 365 migration From Exchange Server
- Export Exchange to Outlook profile/Outlook PST (All versions)
- Exchange mailbox recovery/ Exchange database recovery (EDB)
Office 365 Environments
- Office 365 to Office 365 migration
- Migration into Exchange migration
- Office 365 to PST export
Apart from this, several features are embedded in the tool, making this tool a reliable choice even for newbies. Also, there is no need for technical assistance or any additional software installation to use this software.
Conclusion
I’ve several times across users who had common How to Use “Add-Mailboxpermission” in Exchange Online query. This blog explains the complete process of adding and removing mailbox permissions in Exchange. Also, if you’re not techy or want a hassle-free replacement for Add mailbox cmdlets in Exchange Online mailboxes, in that case, the Shoviv Exchange recovery manager is a reliable and picture-perfect solution for you.
- How to Backup and Restore Emails in Webmail? - March 25, 2025
- How to Migrate Outlook to New Computer? - February 15, 2025
- Fix If Outlook Cannot Display the Specific Folder Location - February 1, 2025


