Several reasons are initiating the users to Migrate PST to Office 365. Microsoft Office 365 migration is a cloud-based Email application that allows working from anywhere in the presence of an Internet connection. Microsoft Office 365 is a boon for businesses, it offers services such as Share Point, Skype for business. Office 365 also facilitates the auto-update facilities with no additional charges to the respective software.
Common reasons to Migrate PST to Office 365:
- Commonly PST files in a system remain unarranged, their number, location and of which they are of, creates confusion; In Office 365 it is easy to properly maintain them. No central arrangement is available for the PSTs in a system/local disk.
- There is security risk with the PST files, portability of PST can cause data outflow and also the chances of malware.
- Even the PSTs that are password protected are not safe, with the use of appropriate tools any attacker can unlock the password. As we all know about the November 2014s Sony hacking case.
Download a trial version of Shoviv PST to Office 365 to know how to migrate PST to Office 365.
How to Migrate PST to Office 365?
To Migrate PST to Office 365 we have manual ways as well as professional way. The manual way doesn’t provide an efficient user-friendly solution for the Outlook PST to Office 365 Migration. To say, in manual methods we have Microsoft Office 365 Import service and Network Upload Method but they are not worth it because of their limitations and drawbacks:
Limitations of Manual method:
- Manual methods are very time- consuming, confusing and completes in many steps.
- For a novice user, they are not anyhow preferred, they ask for the technical expertise to complete the processing.
- There are always a chance of human error and any mistake can lead to data loss.
- If due to any reason migration of PST file fails then in that scenario in the next attempt duplicity will take place.
- For a large number of PST files, the manual method is anyhow not suitable. It is size bounded.
Professional Solution to Migrate PST to Office 365:
To migrate PST to Office 365 in an easy, quick and perfect manner, a professional third-party tool is a must. The Shoviv PST to Office 365 is a picture-perfect solution for this, it comes with a lot of functionalities and provides numerous features to boost the working experience.
Features of Shoviv PST to Office 365:
- The Software allows to migrate PST to Office 365 very swiftly and easily, the user can effortlessly complete the task without any prior technical knowledge.
- It also permits to Add and Recover OST/ PST files (corrupted or healthy) and repair multiple PST Files.
- The Software is also capable to export OST/PST files in Live Exchange.
- The Shoviv PST to Office 365 comes with no size limitation and provides a Folder mapping facility too.
- Option to save OST/PST files items and Outlook Profile Store (mailboxes) in MSG, EML, HTML formats in the disk is also provided in the software.
- Along with other features, options to Split PST file, Merge PST file, Compact and Compress PST file and Remove duplicate items are also given in the software.
- The facility to preview the item before processing and the option of eDiscovery (Search) in Outlook Profile Stores and OST/PST files is also provided.
- To enhance the working of the software, exclude and filter already migrated items during the migration option is also given.
Steps to migrate PST to Office 365:
Step 1. Install and launch Shoviv PST to Office 365.
Step 2: Click on the Add Source button of Ribbon Bar to add the PST files that have to be migrated. 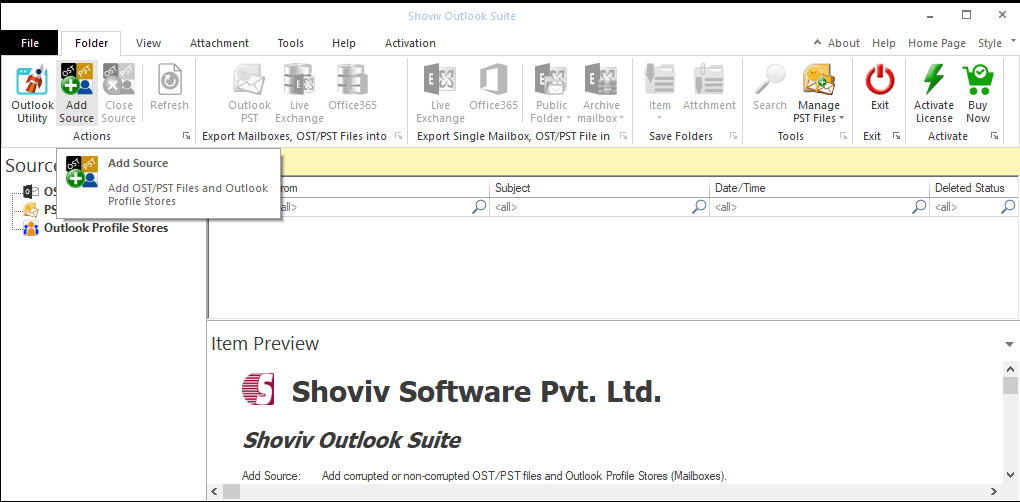
Step 3: A dialog box opens, select the Source type, to add PST file Add and Search options are given and to eliminate Remove and Remove all options are also given. Check the PST files and click on the Next. 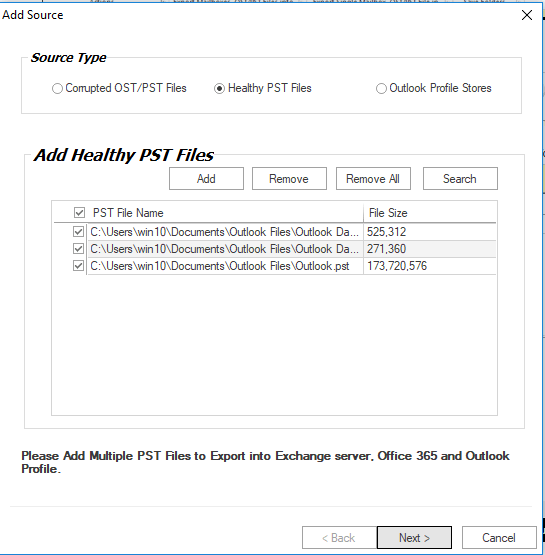
Step 4. Now you can view the added source items in the Source List. Now select the Export multiple mailboxes into Office 365 from the Ribbon Bar or right-click on PST Files and select Export multiple PST files into and then select Office 365. 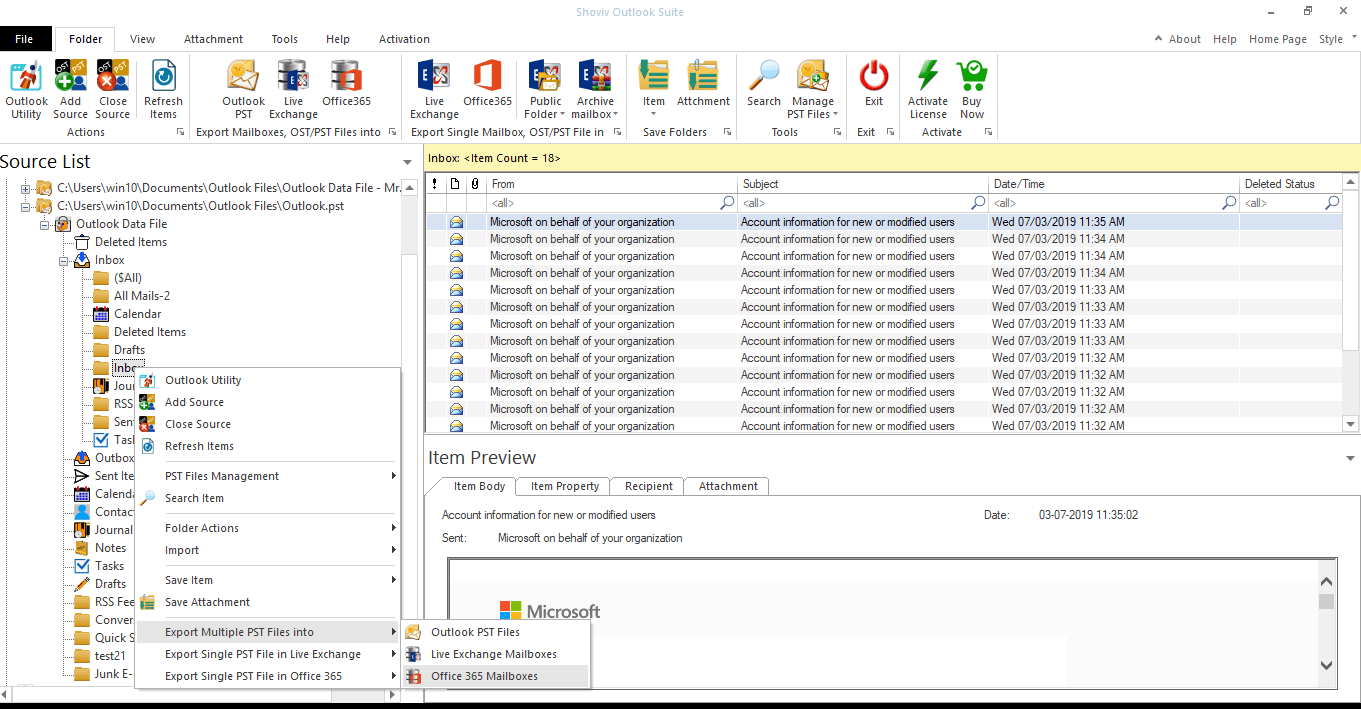
Step 5: A wizard will pop up, it will ask to check/uncheck subfolder. Check the boxes and click on the Next. 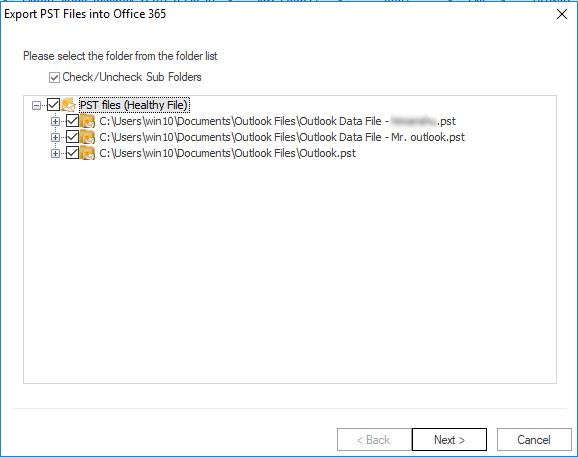
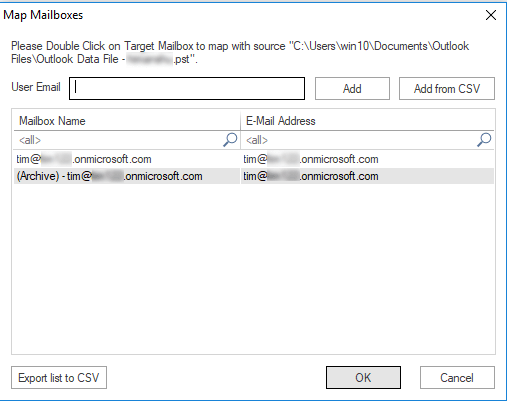
Step 6: Next step will provide the option to Map Mailbox and Validate Target. To Map Mailbox, Check the PST File and map with the target Office365 mailbox. Click on the OK when mapping is done. Although validating is not mandatory, depends on need. Click Next. 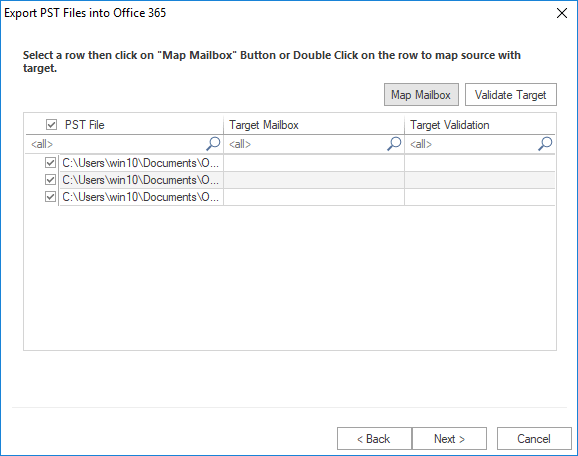
Step 7: Filter page will open, apply the filter based on Process Message Class and Process Item Date as per the need and click on the Next. 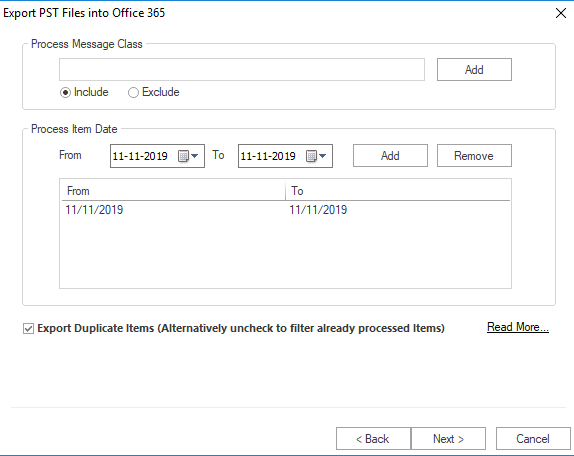
Step 8: The PST file will start migrating. After completing the process, a message of Process Completed Successfully will display, click Ok. Here, the user has the option to save the report by clicking on the Save Report button. Click the Finish when all is done. 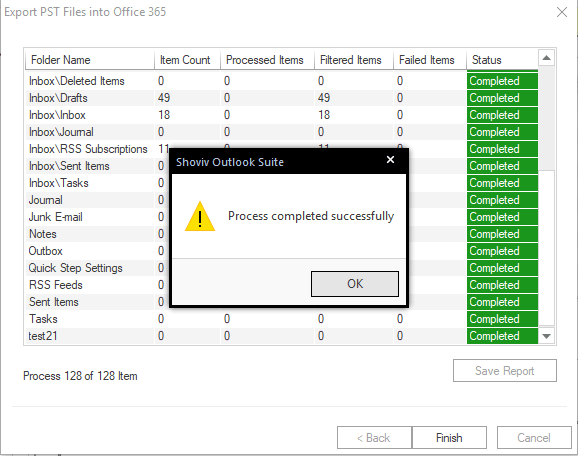
Wrapping up:
To Migrate PST to Office 365, although we have manual methods but they are not suitable due to limitations. To Migrate PST to Office 365 professionally the picture-perfect tool is Shoviv PST to Office 365. It comes with user-friendly GUI and offers numerous features to the user. To check working and processing, a free demo/trial version of the software is also available which allows migration of first 25 items per folder.
- Mailspring vs Thunderbird: The Ultimate 2025 Showdown - April 3, 2025
- Why is My Outlook Offline? Quick Fixes to Get Back Online - March 26, 2025
- Why Microsoft Outlook Keeps Asking for Password & How Do I Fix It? - March 18, 2025


